How to Fix Google Chrome Installation Errors on Windows 10
Google Chrome is one of the most popular web browsers worldwide, known for its speed, simplicity, and reliability. However, sometimes users may encounter issues when trying to install Chrome on Windows 10, with error messages such as “Installation failed.” This guide will walk you through several methods to troubleshoot and resolve this problem effectively.
Understanding the Installation Failure
The failure to install Google Chrome on Windows 10 can be caused by various factors, including corrupted installation files, antivirus software interference, or outdated Windows components. Addressing these underlying issues is crucial to successfully installing Chrome.
1. Ensure Internet Connectivity
The installation process requires a stable internet connection. Ensure that your connection is active and stable before attempting to install Chrome.
Steps:
- Check Internet Connection:
- Open a web browser and try accessing a website to ensure you have an active internet connection.
- Restart Your Router:
- If your internet connection is slow or unstable, try restarting your router. Unplug it, wait 30 seconds, and plug it back in.
- Switch to a Wired Connection:
- If you’re using Wi-Fi, consider switching to a wired Ethernet connection for a more stable installation process.
2. Disable Antivirus Software Temporarily
Sometimes, antivirus software can interfere with the installation process. Disabling your antivirus temporarily can help resolve the issue.
Steps:
- Disable Antivirus:
- Open your antivirus software and look for an option to temporarily disable protection. This option is usually found under settings or security tools.
- Attempt to Install Chrome:
- After disabling the antivirus, try installing Google Chrome again.
- Re-enable Antivirus:
- Once Chrome is installed, make sure to re-enable your antivirus protection.
3. Download the Offline Installer
Using the Google Chrome offline installer can help bypass issues related to internet connectivity or corrupted installation files.
Steps:
- Download the Offline Installer:
- Visit the Google Chrome website and scroll down to find the offline installer link, often labeled as “Download Chrome for another platform.”
- Run the Installer:
- Once downloaded, double-click the installer file to start the installation process.
- Follow the Installation Prompts:
- Follow the on-screen instructions to complete the installation.

4. Clear Temporary Files
Corrupted or incomplete temporary files can prevent Chrome from installing. Clearing these files can help resolve the issue.
Steps:
- Open the Run Dialog Box:
- Press Win + R to open the Run dialog box.
- Type %temp% and Press Enter:
- This will open the Temp folder, which contains temporary files.
- Delete All Files:
- Select all files in the Temp folder and delete them. Don’t worry—these files are safe to delete.
- Try Installing Chrome Again:
- After clearing the temporary files, attempt to install Chrome once more.
5. Run the Program Install and Uninstall Troubleshooter
Microsoft provides a troubleshooter specifically designed to fix issues with installing or uninstalling programs.
Steps:
- Download the Troubleshooter:
- Visit the Microsoft Support website and download the “Program Install and Uninstall Troubleshooter.”
- Run the Troubleshooter:
- Open the downloaded file and follow the prompts to diagnose and fix installation issues.
- Attempt to Install Chrome:
- After running the troubleshooter, try installing Google Chrome again.
6. Update Windows
Outdated Windows components can cause installation failures. Ensure that your Windows 10 system is up to date before attempting the installation.
Steps:
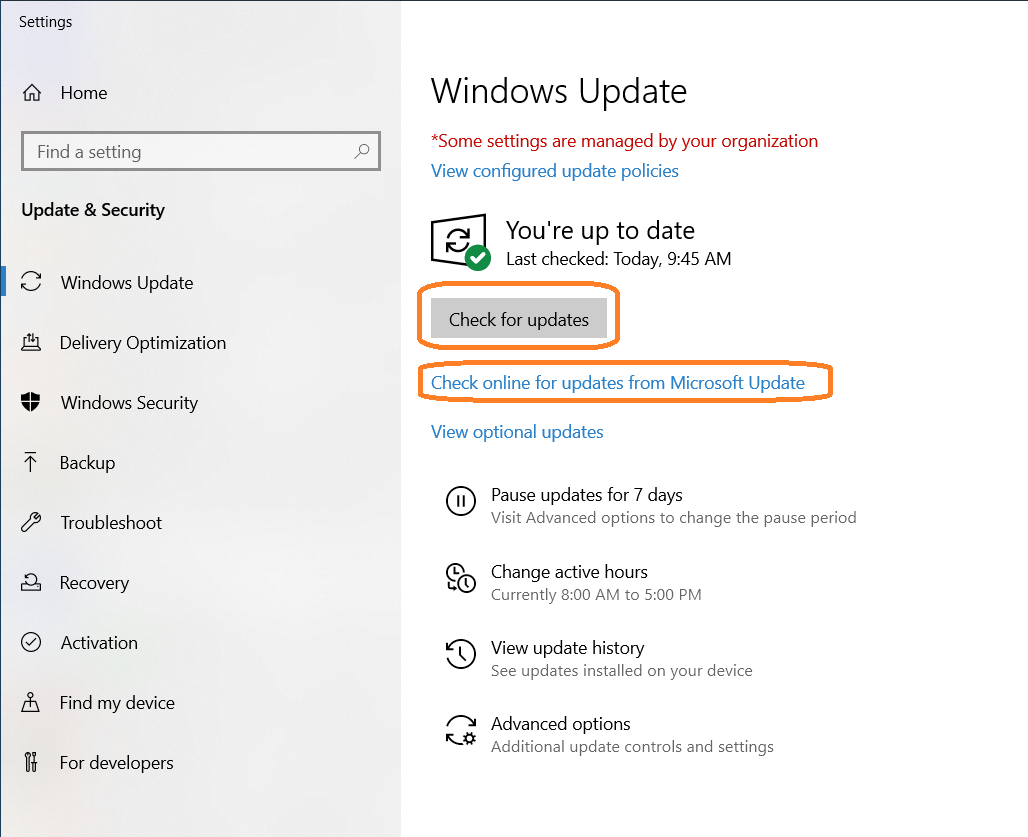
- Open Windows Update:
- Press Win + I to open Settings.
- Go to Update & Security > Windows Update.
- Check for Updates:
- Click Check for updates and install any available updates.
- Restart Your Computer:
- After updating, restart your computer and try installing Chrome again.

7. Install Chrome in Safe Mode
Installing Chrome in Safe Mode can help bypass software conflicts that might be causing the installation to fail.
Steps:
- Enter Safe Mode:
- Press Win + R, type msconfig, and press Enter.
- In the System Configuration window, go to the Boot tab and check Safe boot.
- Click OK and restart your computer to enter Safe Mode.
- Install Google Chrome:
- In Safe Mode, try installing Google Chrome using the offline installer.
- Exit Safe Mode:
- After installation, open msconfig again, uncheck Safe boot, and restart your computer.
Conclusion
By following these steps, you should be able to fix the “Google Chrome Installation Failed” issue in Windows 10 and successfully install the browser. Whether it’s disabling antivirus software, clearing temporary files, or using the offline installer, these methods cover a wide range of potential solutions to get Chrome up and running on your system. Regularly updating your system and ensuring that installation files are downloaded from trusted sources can help prevent such issues in the future.
