What Is Adobe Premiere Elements?
Premiere Elements is Adobe’s video editing software for beginners. It’s targeted primarily towards video enthusiasts who want to get creative with their memories and people who like to experiment with video editing. But it can easily be used by different content creators such as marketing experts, influencers, and vloggers.
Unlike its “big brother,” Adobe Premiere Pro, Elements has an easier-to-use interface, a step-by-step guide for different edits, and is much cheaper.
With Adobe Premiere as your video editor, you can trim, cut, add cool visual effects, and create professional-looking videos. Compared to other video editing programs for beginners, it’s a great tool in terms of capabilities and value for money.
Adobe Premiere Elements Features
The software has many features to help you cut, edit, add effects, reframe, and make video magic. It uses AI to enable users to perform simple corrections. For more complex effects, you can use the guided edits or go straight to expert mode if you feel confident enough in your skills.
Let’s take a closer look at its features.
The Organizer
When you launch the app, it opens a home screen. From there, you have access to the Organizer, Adobe Premiere Elements, and Adobe Photoshop Elements. You can also see your most recent project files, helpful links and suggestions, and Auto Creations.
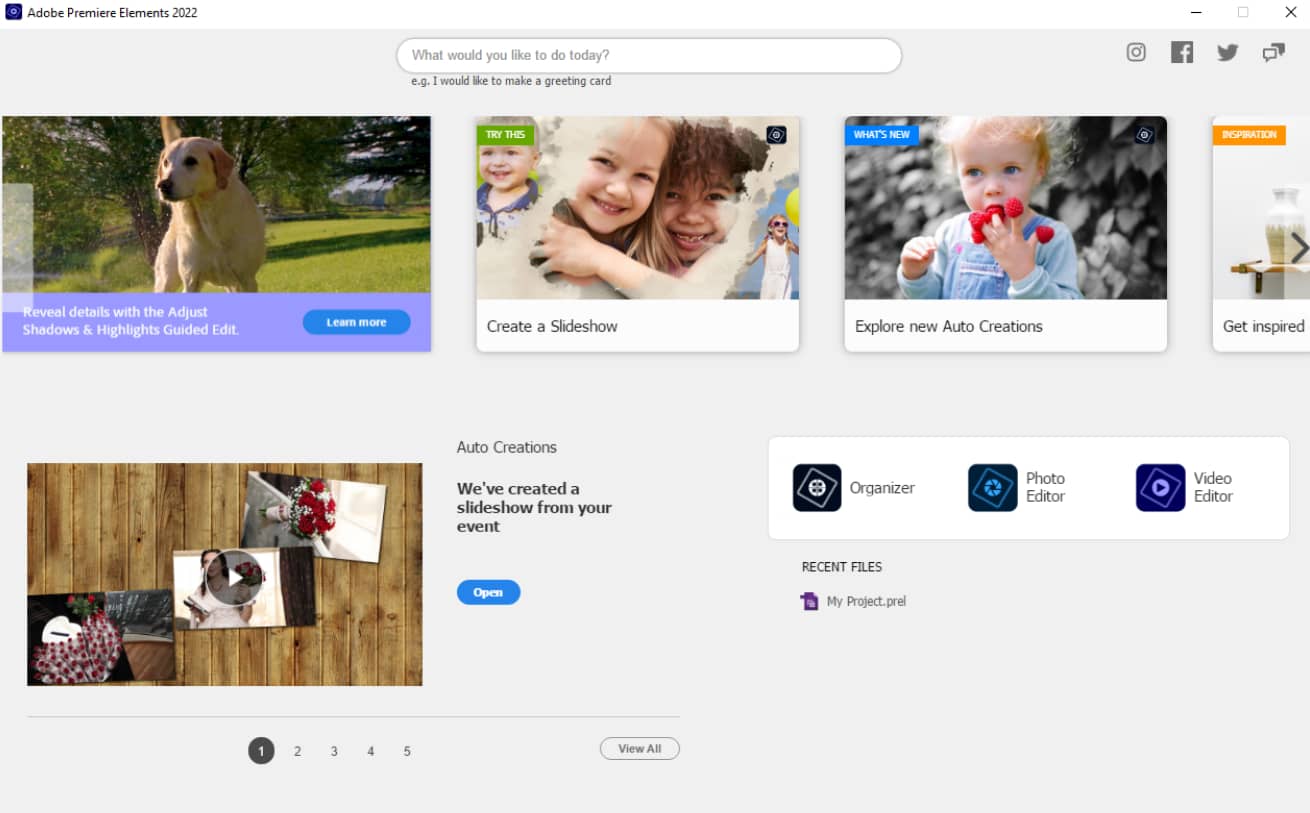
The Organizer is the library where you can upload all your media. In it, you can tag and rate videos, export your creations in different formats, and play GIFs. On top of the app, you can find four categories – Media, People, Places, and Events. Although, it’s a good idea to tag your photos and folders, so it’s easier to navigate your files.

Inside the Organizer, you have an Instant Fix button, but it only works for photos. This app is more photo-oriented and its strength lies with Photoshop Elements. With Adobe Premiere, the editing can be used to create animated slideshows, see the Auto creations and navigate your files easily.
When you go to the top right and click Search, you’ll be directed to the menu with the AI-generated tags and categories. In the search bar, you can combine any number of descriptors to find the needed media. The automatic tags work on photos and videos; however, within the actual videos, the identifying capabilities are limited.

One major downside for me is the lack of stock media integration. Adobe Inc. has its vast gallery dedicated to Adobe Stock. In it, you can get royalty-free files for your projects and it’s a part of the Creative Suite, which you can use with Photoshop or Premiere Pro.
This would be an excellent addition for creating videos for social media or YouTube.
Auto Creations
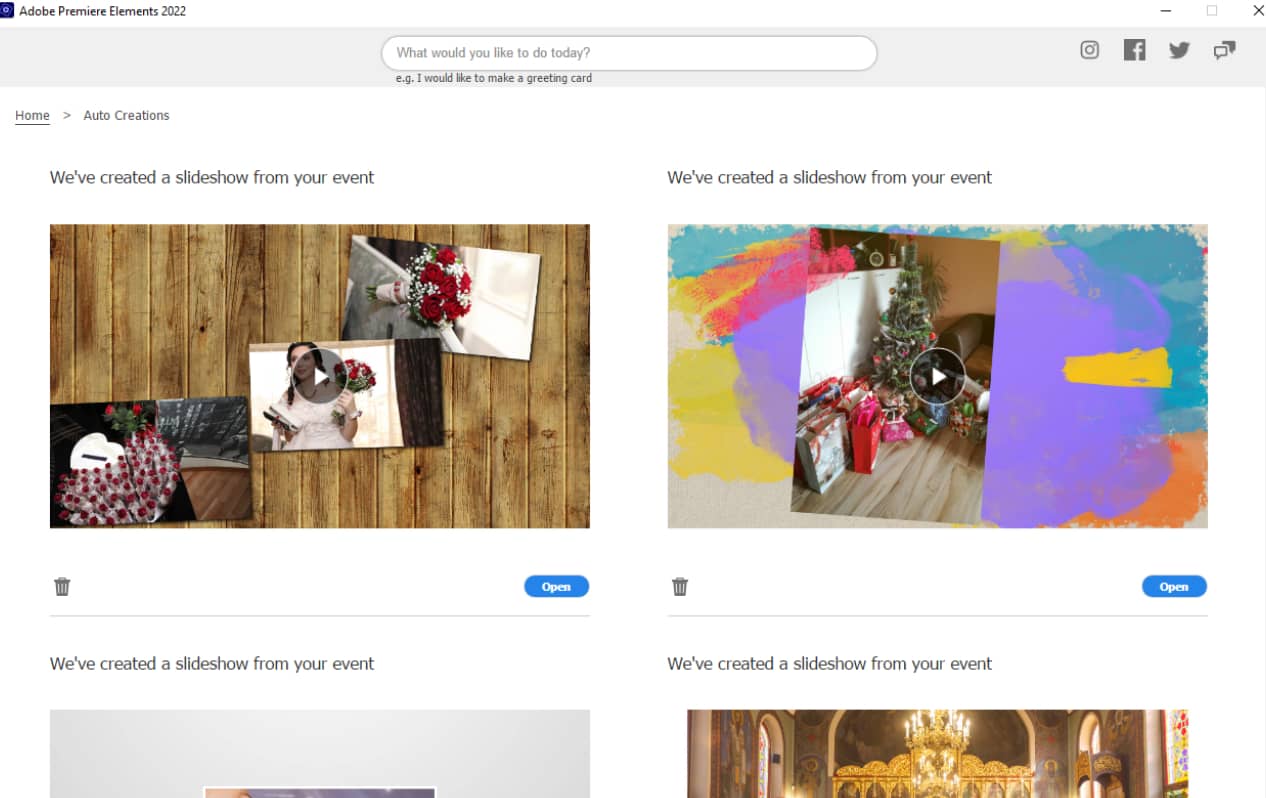
For all the video enthusiasts and social media experts, there’s a great feature called Auto Creations. It’s available right on the Home screen and it can get your creative juices flowing. Here the Adobe software puts the AI to work. After you import all of your media with folders full of photos and videos, the app automatically generates slideshows or collages from your files.
It adds audio based on the topic of your photos, creates transitions and a theme for the background, ultimately giving you a finished product. Of course, after you see it, you can make any alterations to the content.
It’s pretty intuitive and one great bonus is that the projects generated with Auto Creations from Premiere Elements free trial version don’t have a watermark. This can be useful if you create a large amount of content daily.
Quick edit
Another way to finish a project needing just a few touch-ups is with Quick edit. Once you launch Adobe Premiere Elements, you can choose from three work modes, one of them being this feature.
It gives you a simple way to combine, edit, cut, add transitions, audio, and titles – all on a real-time storyboard within an immaculate workspace layout.

AI video corrections
We already mentioned in this Adobe Premiere Elements 2022 review that the software is great for beginners and enthusiasts because of its many AI features. They make it easy to do basic editing without much work or deeper knowledge. You can cut, change the aspect ratio, and add effects with a professional-looking result.
The AI edits include:
- Smart trim – This feature goes through your video, identifies poor-quality footage, and removes it. You can choose between three styles – People, Action, or Mix, which change the outcome of the trim.
It happens relatively fast and you can preview the suggestions before accepting them. The app removes sections that are out-of-focus or too shaky. I tried the people style with extended footage from an event. It successfully identified all the moments when there was some action and cut the rest.

- Auto aspect ratio – You can crop your clip to change the aspect ratio. It’s far from perfect, but it does the trick. Adobe Premiere Elements can crop the video using Adobe Sensei AI, relying heavily on the input video. After applying this tool, you can always change the specifics under Applied FX.
This feature is good if you use devices like webcams or camcorders. They record in 16:9 ratio and if you want a functional social media video, you need a 4:3, 2:3, or 9:16. All marketing experts, according to the latest video statistics, know how vital quality video content is and appreciate this tool.
- Precise selections- This feature lets you apply an effect to particular objects throughout the video.
- Real-time effect adding – This allows you to see the effects immediately without having to render it first. Unfortunately, Adobe Premiere Elements cannot import effects from After Effects directly to the project. There are some effects inside the app with the possibility of buying more. You can get additional VST effects from the Adobe Store or third-party vendors in the form of plug-ins for Premiere Elements.
- Improve grainy videos – If you enjoy shooting videos at night, this will be an invaluable feature. From the FX panel on the right, drag and drop the Reduce Noise icon onto your clip and then adjust it. You can choose from Default, Medium, and High noise reduction to make your videos smoother.
- Candid moments – This goes through your video and chooses the best stills based on light and focus. It’s available in Quick and Expert mode under Tools. After you select it, you can use the slider to add more photos – then create a slideshow from the chosen moments.
- Video stabilization – this option is available in Quick and Expert mode. It helps you fix shaky videos with image stabilization. The process takes some time and a bit of manual effort but Adobe Premiere Elements image stabilization does a fantastic job.
All of the available AI edits can collectively make a pretty decent video. So, if you aren’t using professional cameras but still want to have a professional-looking result, Adobe Premiere Elements can do the trick.
Guided edits
If you’re taking your first steps in video editing with Adobe Premiere Elements, then this next characteristic is for you. The Guided Edits mode consists of step-by-step tutorials to guide you through the process of video editing. Under the Guided mode you will find four pages with different lessons on audio and video effects, shadow and tone adjustments, as well as some fun tricks.

There are a total of 27 tutorials. For this Adobe Premiere Elements 2022 review, we’ll look at some of the more interesting ones, which are all available in the free trial.
Here are some of our choices:
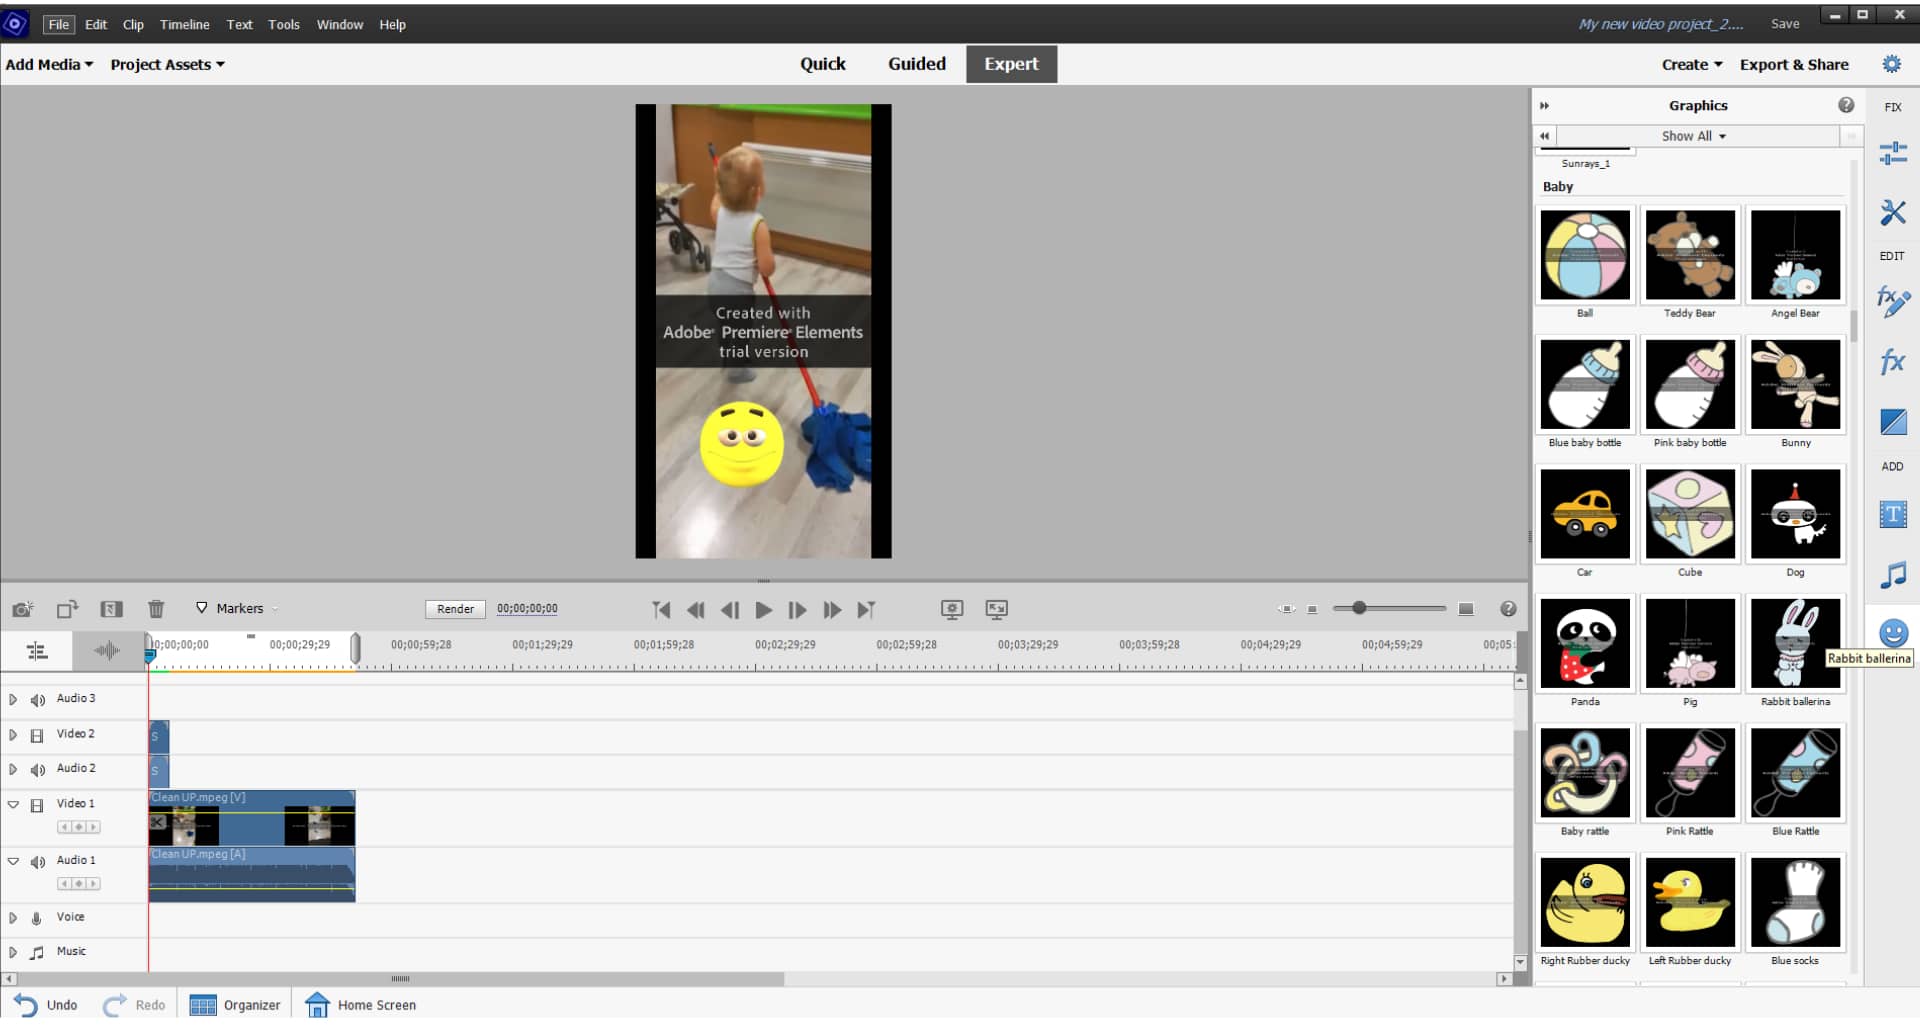
- Animated overlays – You’ll find a smiley face icon located on the right-side panel – click on it. It’ll open a library of graphics that you can use as overlays in your projects. It’s a simple drag-and-drop operation.
- Shadows and highlights – This will provide you with the basics of lighting edits. They’re found in the Effect’s panel with an auto option and sliders for manual adjustments.
Although it’s convenient to have the option to choose between videos or photos, it seems to be lacking the lighting consistency of Adobe Lightroom.

- Double exposures – This is a fun effect that allows you to put your video within a photo. You can choose a photo from the gallery or your own. The outcome depends on the image you use.

- Picture-in-picture – You can place one video on top of another and create a PIP effect.
- Time-lapse videos- Premiere Elements does an excellent job with time-lapse. Apart from speeding up and adding audio, it doesn’t do much more.
- Animate skies in photos- This shows you how to put dramatic-looking clouds in your photos. It could have a nice effect on social media posts.
- Action cam fix – Action cam shooters are a big part of the video editing community. Many of them post actively on YouTube and I imagine they spend a lot of time editing. If you’re a beginner, Premiere’s effects will be just right. The app improves footage, but keep in mind that there are better programs for adding freeze-frames and stabilization.
- Animated social posts – this element could be a valuable tool for all Facebook and Instagram content creators. It helps apply motion and then directs you to the Share option. It isn’t exceptional, but if you have a lot of content to create, it saves you time.
All of the guides are thorough and easy to follow. They make video editing with Adobe Premiere Elements very easy for beginners and people who create videos for fun or just for social media.
Import/Export and Sharing
The app gives you many options for import and export. You can input many different formats and then show your creations to the world.
In terms of importing, you can use HEVC, H.264, .mp4, .mpeg, and most other popular formats. One important note concerns the High Efficiency Video Coding known as H.265. You can only import it on Windows 10; however, you can’t export it in HEVC format.
Another thing is the DV and HDV capture. Adobe Premiere Elements has removed these features. So if you’re using a camcorder as your main footage generator, you will have a more difficult path ahead of you. But, there are workarounds you can find on Adobe’s official website!
The app doesn’t support 3D or 360-degree VR clips either. Perhaps, it will in the future.
Your project can be exported via the ‘Export and Share’ button. It gives you the option to save your project to your computer, share them online, or burn them on DVDs. You can export in various formats such as Flash, MPEG, AVCHD, AVI, WMV, and QuickTime.
You can also directly share your video to Facebook, Youtube, and Vimeo. There’s a Social Media export option that gives you the presets of the ideal social media aspect ratios and resolutions. They’re all available in the Adobe Premiere Elements trial version.
One great option is to export Animated GIFs. You have to choose Devices, click on Custom, go to Advanced Settings and choose Animated GIF from the Format drop-down menu.

Of course, there’s a Quick export option that gives you an MP4 file. The good thing about that is it lets you choose the file size.
When you consider the price of Adobe Premiere Elements, these options are pretty sufficient. All the supported files and formats follow the trends of social media sharing and give you plenty of choices.
Ease of Use and Interface
One of the best features of Adobe Premiere Elements is the interface. It’s clean, user-friendly, intuitive, and straightforward. You can use the app in one of three modes: Quick, Guided, or Expert.

The workspace contains the content panel on top with the standard timeline on the bottom. To the right is the panel with the three main categories- FIX, EDIT, and ADD.
The program can adjust the settings of any added videos to match the ones you’re editing. Adobe Premiere Elements has multiple video tracks for different effects. In the app, you have the option when you choose New Project to select a preset for the entire project.
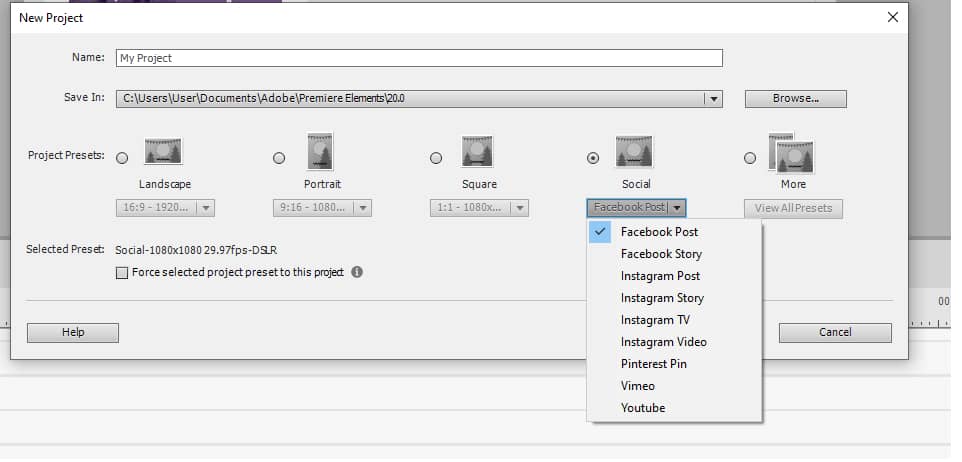
One great feature is the Social Media presets. You have the most popular setups for videos on Facebook, Instagram, YouTube, Vimeo, and Pinterest. This is a massive help for content creators and marketing specialists.
You can import media from your computer, device, or Organizer. One downside of the Organizer is the lack of buttons for specific media types, e.g., audio, photo, video. Having such would make navigation much easier.
The app lacks screen-cam recording and multicam editing. Other than that, most actions like adding effects or changing time length are just drag and drop, making for a pleasant experience.
System Requirements
When you read an Adobe Premiere Elements review, you’re probably wondering if your computer can handle it. Most people associate video editing with very powerful and expensive computers. For this program, you will need a reasonably powerful machine but nothing out of this world.
Let’s start with the operating system. Premiere Elements runs only on 64-bit versions of Windows (Windows 8.1 isn’t supported) and Mac OS X – macOS 10.15 or macOS 11.
Here are the main requirements for your computer:
- A multicore CPU of at least 6th Generation
- Recommended: Intel 7th Generation at least or AMD equivalent with SSE4 and AVX support
- RAM – at least 8GB
- Recommended: 16GB
- Hard disk space available:
- Windows – 6.7GB for installation and 13GB for additional content
- Mac – 8GB for installation and 11GB for additional content
- Display – 1200×800 resolution
- Windows – DirectX 12 with appropriate drivers
- Video card – at least 4GB GPU VRAM
Other recommendations are high-speed internet, a good internal SSD for the installation and cache, and a Windows-compatible DVD burner. All in all, it’s good to have a more robust computer, but for being video editing software, Adobe Premiere Elements doesn’t require too incredible of a set-up.
Adobe Premiere Elements vs. Pro
If you choose Adobe as your video editing software, you will undoubtedly wonder whether to go with Adobe Premiere Pro or Elements. Both are great, but it comes down to what you’re going to use the app for.
Premiere Pro is the most powerful tool for video editing and it’s used by professionals worldwide. With Elements, you can easily create fun videos and edit your vacation footage for sharing with friends and family.
Adobe Premiere Elements price is much lower, plus you pay once, and you get all the features. Pro is a subscription-based plan and the lowest price is $31.49/month. You get constant upgrades, but you’re also constantly paying. With Elements, you still have to pay for the next upgrade, but you can decide not to and just stay with the older version.
Another thing is the interface. Premiere Pro has many more tools and functionality. However, it’s much more complicated to navigate. Elements have fewer editing options, but it’s more user-friendly and easier to work with.
Also worth mentioning is that stock media is one of the Premiere Pro elements which make it better for bigger commercial projects.
You’ll need a much more capable computer to use Premiere Pro’s full potential, whereas not so much with Elements. It requires less CPU and RAM power and is essentially easier to run.
The bottom line is if you’re editing videos as a job, choose Premiere Pro. If you just want to be creative with your material or post on social media, choose Elements.
Adobe Premiere Elements Pricing
Adobe Premiere Elements cost is an excellent value for money. Getting the program on its own costs $99.99 as a one-time purchase. If you are already using it and you want to upgrade to the 2022 version, you have to pay an additional $79.99.
If you aren’t sure about buying or upgrading, you can do your own Premiere Elements 2022 review. There’s a free trial for 30 days giving full access to all of the app’s features. However, the videos you make will have a watermark, whereas the projects made in the Organizer don’t have one.
Another way to get Premiere Elements is as part of a bundle deal. You pay $149.99 and you get it together with Adobe Photoshop Elements, which is a simpler version of the famous Adobe Photoshop. Again if you upgrade from the older pack version, you need to pay another $119.99.


