Excel for Mac Power Query: Complete Data Analysis Guide

Power Query, also known as Get & Transform in Excel, is a powerful data transformation and analysis tool integrated into Excel. While historically more robust on the Windows version, Excel for Mac has been steadily incorporating Power Query features. This guide will walk you through how to leverage Power Query on your Mac for efficient data analysis.
Why Power Query for Data Analysis?
- Seamless Data Integration: Connect to a wide variety of data sources like databases, online services, text files, and more.
- Intuitive Data Transformation: Clean, reshape, and combine data with a user-friendly interface, even without coding knowledge.
- Automation: Schedule refreshes to keep your data up-to-date.
- Enhanced Analysis: Prepare data for further analysis in Excel, PivotTables, or other tools.
Getting Started with Power Query in Excel for Mac
-
Check Availability: Ensure you have a recent version of Excel for Mac. Power Query features are gradually being added.
-
Enable Power Query:
- Go to the “Data” tab.
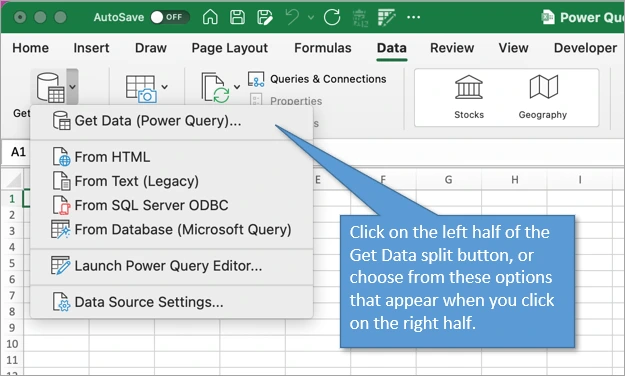
- If you see “Get Data,” Power Query is already enabled. If not, you may need to activate it through Excel’s preferences.

- Import Data:
- Click “Get Data” and choose your data source (e.g., Text/CSV, SQL Server, etc.).
- Follow the prompts to connect to your data and select the tables or data you want.
Transforming Data with Power Query Editor
- Launch Power Query Editor:
- After importing, click “Get Data (Power Query)” > “Launch Power Query Editor.”

-
Explore Transformations:
- The editor offers a wide array of options:
- Filter: Remove unwanted rows.
- Remove Columns: Delete unnecessary columns.
- Transform Columns: Change data types, split columns, or add custom columns.
- Combine Queries: Merge or append data from multiple sources.
- Group By: Aggregate data based on specific columns.
- Pivot/Unpivot: Reshape your data.
- And much more!
- The editor offers a wide array of options:
-
Apply & Close:
- Once satisfied with your transformations, click “Close & Load” to bring the data into your Excel worksheet.
Key Power Query Features on Mac
- Refreshing Data: Easily refresh your data connections to get the latest information.
- Managing Queries: Organize and edit your queries in the Power Query Editor.
- Data Profiling: Get insights into your data’s structure and quality.
- M Language (Limited): While not as extensive as on Windows, you can still use some M language for custom transformations.
Tips and Considerations
- Start Simple: Begin with basic transformations and gradually explore more advanced features.
- Documentation: Refer to Microsoft’s official documentation for detailed instructions and examples.
- Online Resources: Numerous tutorials and forums are available online to help you learn Power Query.
- Windows Compatibility: If you need more advanced Power Query features, consider using the Windows version of Excel.
Conclusion
While Power Query on Excel for Mac might not have all the bells and whistles of the Windows version, it’s still a powerful tool for data analysis. By mastering the available features, you can streamline your data preparation process and unlock valuable insights.
Related articles
» Set Excel as the Default Application on Mac | Excel for Mac
» Installing Microsoft Excel for Mac: Step-by-Step Guide
» Choosing the Right Operating System: Windows, macOS, or Linux?

