How to Resolve Unidentified Network Issues on Windows 11/10
Encountering the “Unidentified Network” error on Windows 11/10 can disrupt your internet connectivity, preventing access to websites, applications, or online resources. This issue can occur due to incorrect network settings, outdated drivers, or problems with the router. Follow this comprehensive guide to diagnose and resolve the problem.
Common Causes of the Unidentified Network Error
- Incorrect IP Configuration: Static IP settings or misconfigured DHCP can cause network issues.
- Outdated or Corrupted Network Drivers: Incompatible or broken drivers may disrupt connectivity.
- Firewall or Antivirus Interference: Security software might block network access.
- Router or Modem Issues: Malfunctioning hardware can cause connection errors.
- Windows Network Settings Problems: Corrupted or misconfigured network profiles can lead to the error.
Steps to Fix the Unidentified Network Error
Step 1: Restart Your Router and PC
- Turn off your router or modem and unplug it from the power source.
- Wait for 5 minutes, then plug it back in and turn it on.
- Restart your computer to refresh the network connection.
Step 2: Run the Windows Network Troubleshooter
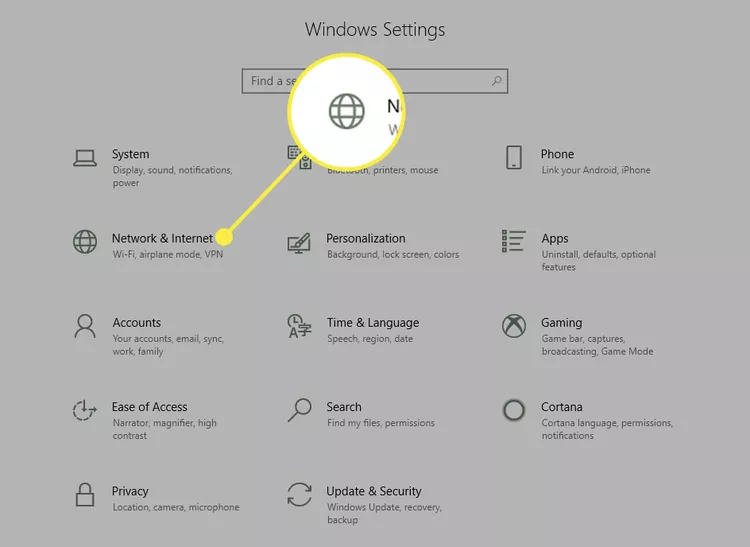
- Press Windows + I to open Settings.
- Navigate to Network & Internet > Status.
- Click Network troubleshooter and follow the prompts.
This tool will automatically detect and fix common network issues.
Step 3: Reset Your IP and DNS Configuration
- Open Command Prompt as an administrator by searching for it in the Start menu and selecting Run as administrator.
- Type the following commands one by one, pressing Enter after each:
ipconfig /release ipconfig /renew ipconfig /flushdns - Restart your computer and check your connection.
Step 4: Update Network Drivers
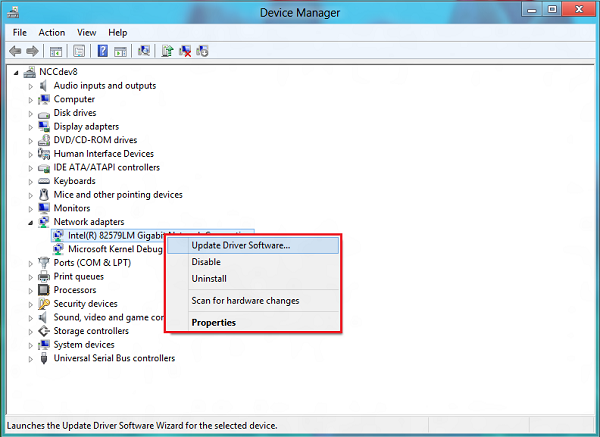
- Press Windows + X and select Device Manager.
- Expand the Network adapters section.
- Right-click on your network adapter and select Update driver.
- Choose Search automatically for drivers to let Windows find the latest driver.
If this doesn’t work, visit the manufacturer’s website to download and install the latest driver manually.
Step 5: Disable or Enable the Network Adapter
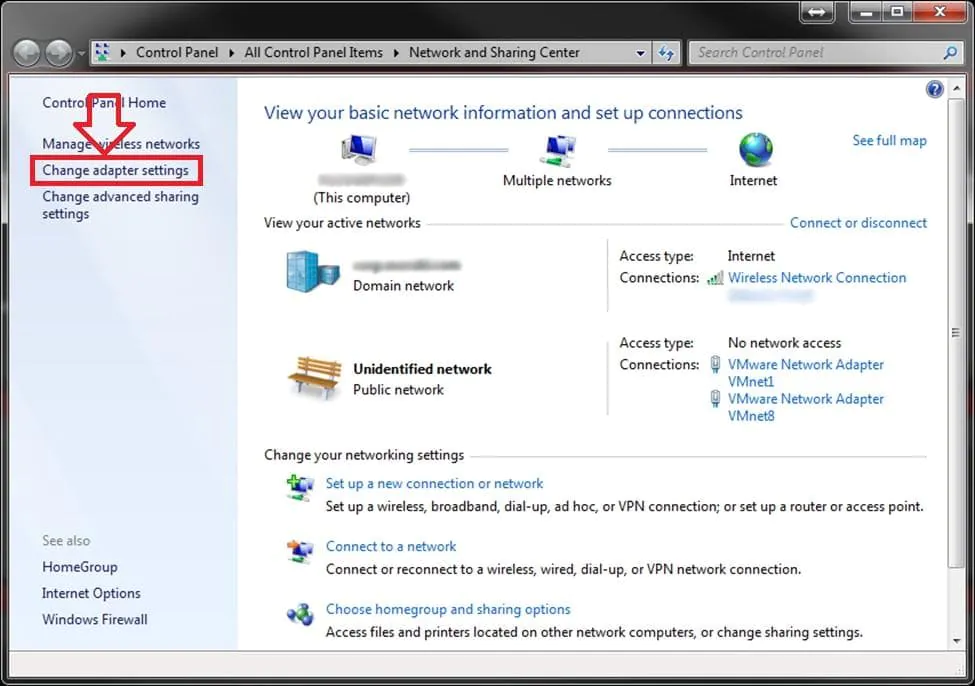
- Open Control Panel and navigate to Network and Sharing Center.
- Click Change adapter settings on the left-hand side.
- Right-click on your active network connection and select Disable.
- Wait a few seconds, then right-click the adapter again and select Enable.
Step 6: Check for Firewall or Antivirus Interference
- Temporarily disable your firewall or antivirus software.
- Check if the network issue is resolved. If it is, add an exception for your network in the software settings.
- Remember to re-enable your firewall or antivirus afterward.
Step 7: Perform a Network Reset
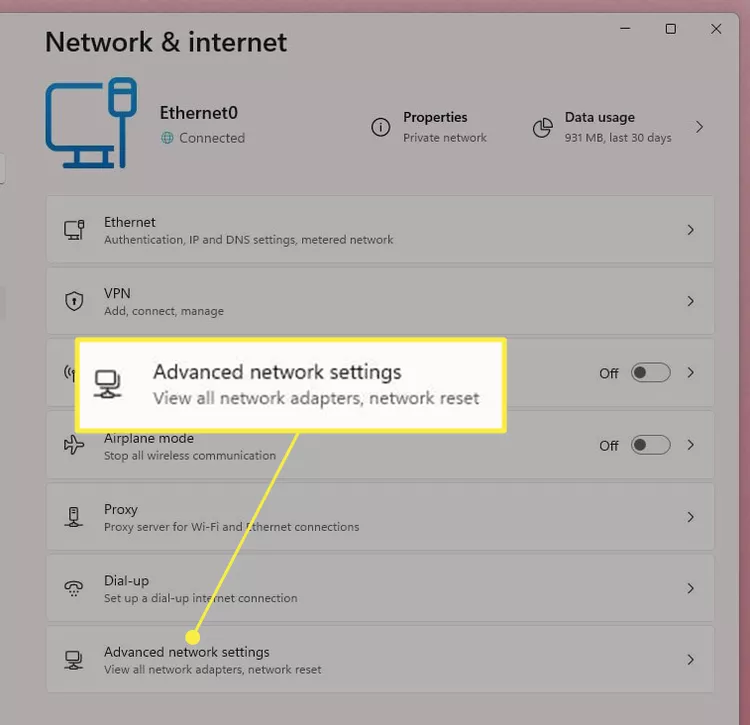
- Press Windows + I to open Settings.
- Go to Network & Internet > Advanced network settings (in Windows 11) or Network reset (in Windows 10).
- Click Network reset and follow the prompts to reset all network settings.
Step 8: Assign a Static IP Address
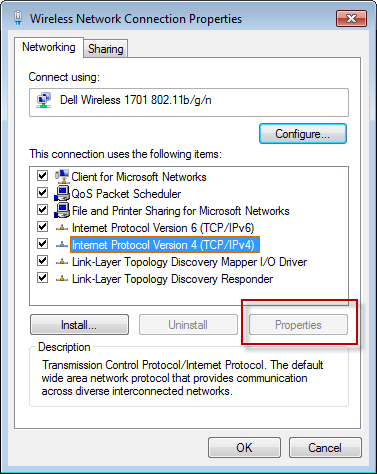
- Open Control Panel and navigate to Network and Sharing Center.
- Click on your active network connection and select Properties.
- Double-click Internet Protocol Version 4 (TCP/IPv4).
- Choose Use the following IP address and enter the following values:
- IP address:
192.168.1.x(replacexwith a unique number) - Subnet mask:
255.255.255.0 - Default gateway:
192.168.1.1
- IP address:
- Click OK and restart your computer.
Step 9: Check Router Settings
- Log in to your router’s admin panel by entering its IP address (usually
192.168.1.1) into a web browser. - Ensure DHCP is enabled to automatically assign IP addresses.
- Restart the router after saving any changes.
Conclusion
The “Unidentified Network” error in Windows 11/10 can be caused by various factors, including incorrect settings, driver issues, or hardware problems. By following the steps outlined in this guide, you should be able to resolve the issue and restore your internet connection. If the problem persists, contact your internet service provider or seek professional technical support.
