How to Resolve the “Standard Hardware Security Not Supported” Issue
Windows 10 and 11 are equipped with several security features to protect your system. One of these is Standard Hardware Security, which uses the Trusted Platform Module (TPM) and other hardware elements to enhance security. However, users sometimes encounter the error message: “Standard Hardware Security Not Supported” when checking their security settings.
This error can be alarming, but it often means that certain security hardware features aren’t enabled or supported by your system. In this guide, we will walk you through how to resolve this issue and enable the required settings for your device to support hardware security.
What Causes the “Standard Hardware Security Not Supported” Error?
This error typically occurs due to the following reasons:
- TPM is not enabled: Your device’s TPM (Trusted Platform Module) may be disabled in the BIOS or not installed.
- Secure Boot is disabled: Secure Boot ensures that your device boots only with software trusted by the manufacturer.
- No UEFI boot: If your system is using the old BIOS boot method rather than UEFI, the error can appear.
- Processor does not support hardware security: Some older CPUs do not support features like virtualization-based security.
Let’s now discuss solutions for each of these issues.
Solution 1: Enable TPM in BIOS

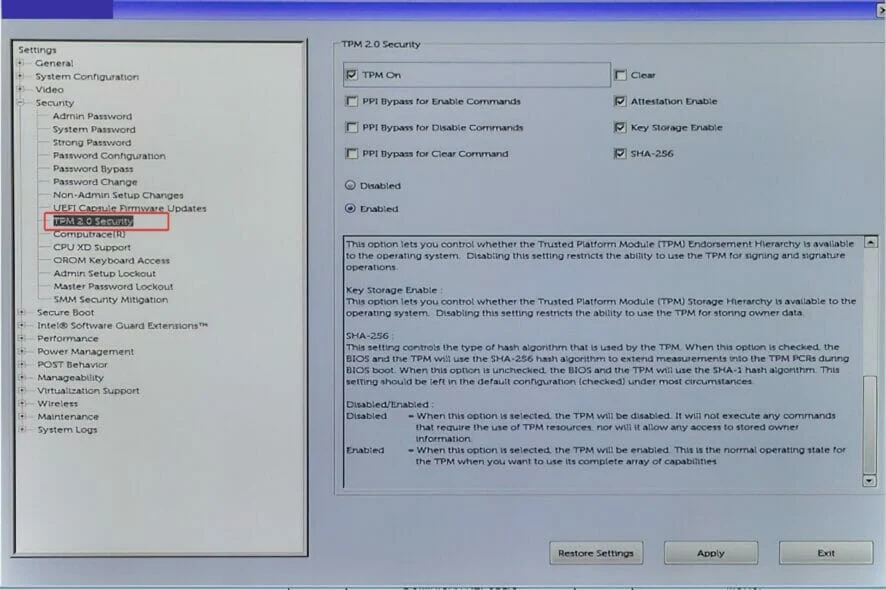
TPM (Trusted Platform Module) is a hardware feature that helps with cryptographic operations. If it is disabled in the BIOS, you will see this error.
Steps to Enable TPM:
- Restart your PC and enter the BIOS/UEFI settings. This is usually done by pressing a key like F2, Delete, or Esc during startup.
- Look for Security or Advanced settings in the BIOS menu.
- Find the option for TPM or Intel PTT (Platform Trust Technology), depending on your processor, and enable it.
- Save your changes and exit BIOS.
Once the TPM is enabled, your system should support hardware security. You can check this by navigating to Settings > Update & Security > Device Security and confirming that the error is gone.
Solution 2: Enable Secure Boot
Secure Boot is another important feature that ensures only trusted software is loaded during startup. If Secure Boot is disabled, you might see the “Standard Hardware Security Not Supported” message.
Steps to Enable Secure Boot:
- Restart your PC and enter the BIOS/UEFI settings by pressing the appropriate key during startup (usually F2 or Delete).
- In the BIOS menu, look for Boot Options or Security Settings.
- Find the Secure Boot option and enable it.
- Save the changes and restart your computer.
This step ensures that Secure Boot is enabled, which is necessary for hardware security compliance.
Solution 3: Switch from Legacy BIOS to UEFI
If your system is still using the old Legacy BIOS instead of UEFI (Unified Extensible Firmware Interface), it may not support certain modern security features. Switching to UEFI mode may resolve the error.
Steps to Convert BIOS to UEFI:
- Type msinfo32 in the Windows search bar and press Enter. In the System Information window, look for BIOS Mode. If it says “Legacy,” you are not using UEFI.
- To switch, you will first need to back up your data.
- Open the Command Prompt as Administrator and type the following command to validate that you can convert:
bash
mbr2gpt /validate
- If validated, run this command to start the conversion:
bash
mbr2gpt /convert
- After conversion, reboot your system and access the BIOS settings. In the Boot menu, change the boot mode from Legacy to UEFI.
Switching to UEFI will allow your system to enable hardware security features like Secure Boot and TPM.
Solution 4: Check Processor Compatibility
Some processors, especially older ones, might not support the advanced security features that Windows 10 or 11 requires for hardware security. Ensure your processor is compatible by checking the specifications on the manufacturer’s website or using tools like CPU-Z.
Solution 5: Enable Virtualization-Based Security (VBS)

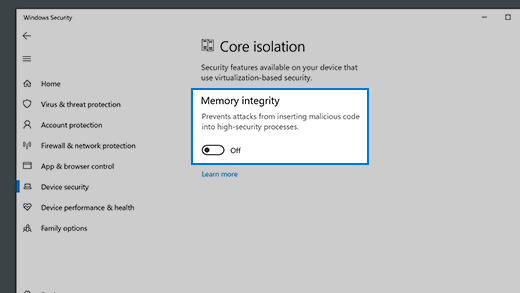
Virtualization-Based Security (VBS) helps isolate critical system processes from the rest of your OS. This may also be required for hardware security.
Steps to Enable VBS:
- Press Windows + I to open Settings.
- Navigate to Update & Security > Windows Security > Device Security.
- Under Core isolation, toggle Memory integrity to ON.
- Restart your computer to apply the changes.
VBS is an important feature that enhances system security and helps ensure compatibility with hardware security requirements.
Solution 6: Update Your BIOS
If none of the above solutions work, you might need to update your BIOS. Manufacturers often release updates that improve compatibility with modern security features.
Steps to Update BIOS:
- Visit the website of your motherboard manufacturer and download the latest BIOS update for your model.
- Follow the manufacturer’s instructions carefully to update the BIOS, as incorrect updates can cause issues with your system.
Updating your BIOS can ensure that your system supports all the latest security standards.
Conclusion
The “Standard Hardware Security Not Supported” error in Windows 10 and 11 can be caused by a variety of settings related to hardware security. By following the solutions outlined above, including enabling TPM, Secure Boot, and switching to UEFI, you should be able to fix this error. It’s important to make sure your system supports the required security features to ensure your data and device are protected.
