A Complete Guide to Sorting in Excel

Sorting data in Excel is an essential skill for anyone working with spreadsheets. Whether you need to organize a list of names, dates, or numbers, Excel’s sorting tools allow you to quickly arrange your data in a meaningful order. In this comprehensive guide, we’ll walk through the different methods of sorting in Excel, including basic sorts, custom sorts, and multi-level sorting for more complex datasets.
Basic Sorting in Excel
Sorting data in Excel is quite straightforward. You can sort columns alphabetically, numerically, or by date.
Step 1: Select the Data to Sort
To sort data, first highlight the range you want to organize. If you want to sort an entire table, just click anywhere within the table. Excel will automatically select the whole dataset.
Step 2: Use the Sort Option
- Navigate to the Data tab on the Excel Ribbon.
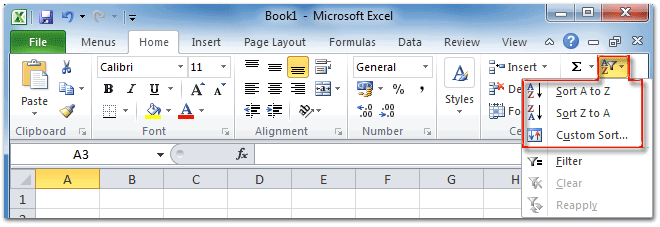
- In the “Sort & Filter” group, you’ll see two key options:
- Sort A to Z: Sorts the data in ascending order.
- Sort Z to A: Sorts the data in descending order.

Step 3: Apply the Sort
Once you click either option, Excel will arrange the selected data accordingly.
Sorting by Custom Lists
In addition to alphabetical and numerical sorting, Excel also lets you sort by custom lists. This is useful when sorting items like days of the week or months of the year in a logical order rather than alphabetically.
Step 1: Create a Custom List
- Click on the File menu and select Options.
- Go to the Advanced section, scroll down, and under the “General” section, click on Edit Custom Lists.
- In the Custom Lists box, either select an existing list (e.g., months or days) or create your own by typing the values in order.
Step 2: Apply the Custom Sort
- Select your data and go to the Data tab.
- Click on Sort to open the Sort dialog box.
- Under the “Order” dropdown, select Custom List, and choose the list you created or one of Excel’s built-in lists.
This allows you to sort data according to custom criteria.
Sorting by Multiple Columns (Multi-Level Sorting)
In many cases, sorting by one column isn’t enough, especially in large datasets. Excel lets you sort by multiple levels for a more precise arrangement.
Step 1: Select Your Data
Highlight the entire data range or place the cursor within the dataset.
Step 2: Open the Sort Dialog Box
- In the Data tab, click on Sort.
- The Sort dialog box appears. Here, you can specify which columns to sort by and in what order.
Step 3: Add Multiple Sort Levels
- Under Column, select the first column to sort by (e.g., “Last Name”).
- Click Add Level to introduce another column (e.g., “First Name”).
- Set the sorting order for each column (A to Z or Z to A) and click OK.
Excel will first sort by the primary column (Last Name), and within matching values, it will sort by the second column (First Name).
Sorting by Cell Color or Font Color
Another useful feature in Excel is sorting by cell color or font color. This is helpful if you’ve used conditional formatting or color-coding to organize data visually.
Step 1: Open the Sort Dialog Box
As with the previous examples, select your data and click on Sort in the Data tab.
Step 2: Choose Sort by Color
- In the Sort dialog box, choose the column that contains the colored cells.
- Under Sort On, select Cell Color or Font Color.
- In the Order dropdown, choose which color should appear at the top or bottom, then click OK.
Sorting with Filters
If you’re working with a large dataset, you can use filters to sort data more dynamically.
Step 1: Enable Filters
- Click on any cell in your dataset.
- Go to the Data tab and click on Filter. This adds dropdown arrows to the header of each column.
Step 2: Sort Using Filters
- Click the dropdown arrow in the column you want to sort.
- You’ll see the options to Sort A to Z, Sort Z to A, or use additional sorting features like color sorting.
Common Issues and Solutions When Sorting in Excel
Sorting data in Excel is usually smooth, but occasionally issues can arise.
1. Sorting Only a Single Column
If you sort one column but not the rest of the table, your data could become misaligned. To avoid this, make sure you’ve selected the entire dataset before sorting.
2. Empty Rows or Columns
Excel stops sorting at the first blank row or column. Ensure there are no empty rows or columns in the dataset for a continuous sort.
3. Merged Cells
Merged cells can cause sorting problems, as Excel doesn’t handle them well in large datasets. Unmerge cells before sorting if necessary.
Conclusion
Sorting in Excel is an essential skill that can help you organize and analyze data efficiently. Whether you’re doing a simple sort by alphabetical order or working with complex multi-level sorting, Excel provides robust tools to get the job done.
By mastering these sorting techniques, you can manage your data more effectively and make informed decisions based on well-organized information.
