How to Set Up Rules in Outlook
Creating rules in Microsoft Outlook allows you to automate email management. Whether you want to organize your inbox, prioritize certain messages, or automatically move emails into folders, Outlook’s rule feature can save you time and effort. This guide will take you through the step-by-step process of creating rules in Outlook, explaining different options and providing helpful tips.

1. What Are Rules in Outlook?
Rules in Outlook are automated actions that apply to incoming or outgoing messages based on specific conditions you set. For example, you can create a rule to:
- Move emails from a specific sender to a designated folder.
- Highlight important messages with flags or categories.
- Automatically forward certain messages to another recipient.
2. Benefits of Using Rules in Outlook
Using rules offers several advantages, including:
- Improved Organization: Automatically sort emails into folders, keeping your inbox clutter-free.
- Time Savings: Reduce the need for manual email management.
- Prioritization: Focus on emails that matter most by highlighting or flagging them.
- Custom Automation: Tailor rules to meet your specific workflow needs.
3. Creating Rules in Outlook on a Desktop
Follow these steps to create rules in the desktop version of Microsoft Outlook.
Step 1: Open the Rules Wizard
- Launch Microsoft Outlook on your computer.
- Go to the Home tab on the ribbon.
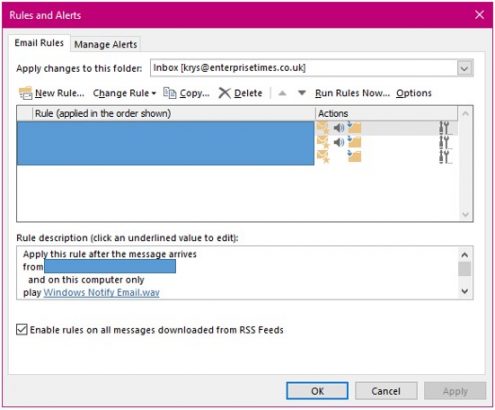
- Click on Rules, located in the “Move” group.
- Select Manage Rules & Alerts from the dropdown menu.

Step 2: Create a New Rule
- In the Rules and Alerts dialog box, click New Rule.
- The Rules Wizard will appear, presenting several options to choose from:
- Move messages from someone to a folder: Ideal for organizing emails by sender.
- Flag messages for follow-up: Useful for prioritizing tasks.
- Play a sound when messages arrive: Handy for notifications.

Step 3: Define the Rule Conditions
- Choose a template or start from a blank rule.
- Select the conditions that apply to your rule. For example:
- Emails from a specific sender.
- Emails containing certain keywords in the subject or body.
- Emails sent to a specific distribution list.
- Click Next and specify additional conditions if needed.
Step 4: Specify Actions
- Select the action you want Outlook to perform. For example:
- Move the email to a specific folder.
- Delete the email.
- Mark the email as read.
- Choose the destination folder or any other applicable settings.
- Click Next.
Step 5: Add Exceptions (Optional)
- Add exceptions to your rule to ensure certain emails are excluded. For example:
- Emails marked as important.
- Emails from specific people or containing specific words.
- Click Next once you’ve added exceptions.
Step 6: Name and Activate the Rule
- Give your rule a descriptive name (e.g., “Move newsletters to folder”).
- Check the box to run the rule on messages already in your inbox (if applicable).
- Click Finish to save your rule.
4. Creating Rules in Outlook on the Web
If you use Outlook on the web, follow these steps to create rules:
- Sign in to Your Account:
- Log in to your Outlook account via a web browser.
- Access Settings:
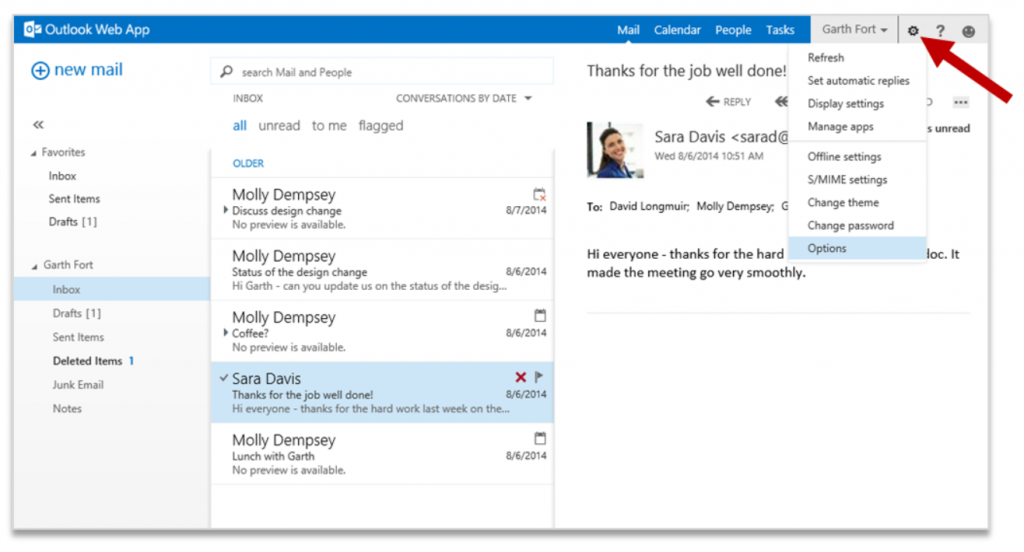
- Click the Settings icon (gear icon) in the top-right corner.

- Select View all Outlook settings.
- Click the Settings icon (gear icon) in the top-right corner.
- Navigate to Rules:
- Go to Mail > Rules.
- Create a New Rule:
- Click Add new rule.
- Name the rule and set conditions (e.g., sender, subject).
- Define the actions to take (e.g., move to folder, delete).
- Click Save.
5. Editing or Deleting Rules
If you need to modify or delete a rule, follow these steps:
- Access the Rules Manager:
- For desktop: Go to Manage Rules & Alerts.
- For web: Navigate to Settings > Mail > Rules.
- Edit the Rule:
- Select the rule and click Edit. Adjust the conditions, actions, or exceptions.
- Delete the Rule:
- Select the rule and click Delete to remove it entirely.
6. Tips for Creating Effective Rules
- Use Specific Conditions: The more specific your conditions, the more accurate the rule will be.
- Test the Rule: Apply it to existing emails to ensure it works as intended.
- Organize Your Folders: Before creating rules, set up folders for better organization.
- Avoid Overlapping Rules: Make sure your rules don’t conflict with each other.
- Review Regularly: Periodically review your rules to ensure they are still relevant.
7. Common Use Cases for Rules
Here are some examples of how you can use rules effectively:
- Managing Newsletters:
- Move all subscription emails to a “Newsletters” folder.
- Flagging Important Emails:
- Automatically flag emails from your manager or team lead.
- Organizing Client Emails:
- Sort emails from specific clients into designated folders.
- Spam Control:
- Delete emails containing specific keywords often associated with spam.
8. Troubleshooting Rule Issues
If your rules aren’t working, try these solutions:
- Check for Conflicts: Ensure that rules don’t contradict each other.
- Increase Rule Priority: Move the rule higher in the list if it’s not being applied.
- Verify Server Settings: For server-side rules, ensure they sync properly.
- Test on New Emails: Rules typically only apply to new messages, unless specified otherwise.
Conclusion
Creating rules in Microsoft Outlook is a powerful way to streamline your email management. By automating tasks like sorting, flagging, and deleting messages, you can focus on what truly matters. Whether you’re using Outlook on a desktop or the web, the steps outlined in this guide will help you create and manage rules effectively. Take control of your inbox and enjoy a more organized email experience!
