How to Resolve the Issue of Windows 10 Scrolling on Its Own
Experiencing automatic scrolling in Windows 10 can be frustrating, especially when you’re trying to work or browse. This issue may be caused by software glitches, driver problems, or hardware malfunctions like faulty mice or touchpads. This guide explains the possible causes and offers detailed steps to resolve the problem effectively.
Common Causes of Automatic Scrolling
Before diving into solutions, it’s essential to understand what might be causing the issue:
- Faulty Mouse or Touchpad:
- A malfunctioning scroll wheel or touchpad gestures can cause unwanted scrolling.
- Outdated or Corrupt Drivers:
- Drivers for your mouse, keyboard, or touchpad may need updates or repairs.
- Settings Misconfigurations:
- Incorrect settings in Windows 10, like touchpad sensitivity or scrolling options, may be contributing to the issue.
- Stuck Keys or Inputs:
- A stuck Page Up, Page Down, or arrow key can cause scrolling to occur.
Step 1: Test Your Mouse or Touchpad
Start by checking the physical devices:
Check the Mouse:
- Unplug the Mouse
- If you’re using a USB mouse, disconnect it and observe whether the scrolling issue persists.
- Test a Different Mouse
- Use another mouse to check if the problem continues.
Check the Touchpad:
- Disable the Touchpad
- Go to Settings > Devices > Touchpad and temporarily turn off the touchpad to see if the issue resolves.

- Go to Settings > Devices > Touchpad and temporarily turn off the touchpad to see if the issue resolves.
- Clean the Touchpad
- Wipe the surface with a soft cloth to ensure there’s no dirt or residue affecting sensitivity.
Step 2: Update or Reinstall Mouse and Touchpad Drivers
Outdated or corrupt drivers are often the culprits behind automatic scrolling issues.
- Open Device Manager
- Press Windows + X and select Device Manager.
- Locate Mouse and Touchpad Devices
- Expand Mice and other pointing devices and Human Interface Devices.

- Expand Mice and other pointing devices and Human Interface Devices.
- Update the Drivers
- Right-click the device (e.g., your mouse or touchpad) and select Update driver.
- Choose Search automatically for updated driver software.

- Reinstall the Drivers
- If updating doesn’t help, uninstall the device:
- Right-click the device and select Uninstall device.
- Restart your PC, and Windows will reinstall the drivers automatically.
- If updating doesn’t help, uninstall the device:
Step 3: Adjust Mouse and Touchpad Settings
Tweaking the settings might resolve scrolling problems:
- Access Mouse Settings
- Go to Settings > Devices > Mouse.
- Check Scrolling Options
- Ensure the Scroll inactive windows when I hover over them option is turned off.

- Ensure the Scroll inactive windows when I hover over them option is turned off.
- Adjust Touchpad Sensitivity
- Navigate to Settings > Devices > Touchpad.
- Set the sensitivity to Low or Medium to avoid accidental scrolling.
Step 4: Check for Stuck Keys
A stuck key, such as Page Up, Page Down, or the arrow keys, could trigger automatic scrolling.
- Inspect Your Keyboard
- Physically check each key to ensure none are stuck or jammed.
- Test a Different Keyboard
- Disconnect your current keyboard and use another one temporarily.
Step 5: Disable Smooth Scrolling
Sometimes, the smooth scrolling feature can cause erratic behavior in certain applications.
- Open Internet Options
- Press Windows + S, type Internet Options, and open it.
- Disable Smooth Scrolling
- Navigate to the Advanced tab.
- Uncheck Use smooth scrolling under Browsing.
- Click Apply and OK.

Step 6: Scan for Malware
Malware or rogue applications can cause unusual behavior, including automatic scrolling.
- Run a Full Scan with Windows Defender
- Open Settings > Update & Security > Windows Security.
- Click Virus & Threat Protection and select Quick Scan.

- Use Third-Party Antivirus Software
- Run a scan with trusted software like Malwarebytes to ensure no malware is present.
Step 7: Check for Windows Updates
Ensure your Windows 10 system is up to date to fix potential software bugs:
- Go to Settings > Update & Security > Windows Update.
- Click Check for updates.
- Download and install any available updates.
Step 8: Perform a Clean Boot
A clean boot starts Windows with only essential services, helping identify whether third-party software is causing the issue.
- Open System Configuration
- Press Windows + R, type msconfig, and hit Enter.
- Select Services Tab
- Check Hide all Microsoft services and click Disable all.
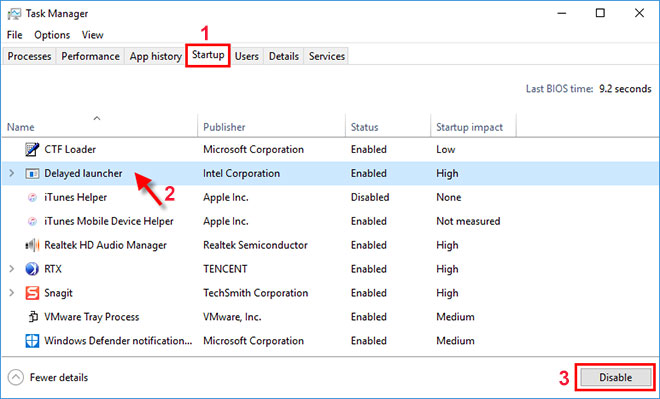
- Disable Startup Programs
- Go to the Startup tab and click Open Task Manager.
- Disable all startup items.

- Restart your computer and test for the issue.
Step 9: Reset Your PC Settings
If all else fails, resetting your PC’s settings to default may resolve the problem:
- Go to Settings > Update & Security > Recovery.
- Under Reset this PC, click Get Started.
- Follow the prompts to reset your settings while keeping your personal files.
Conclusion
The automatic scrolling issue in Windows 10 can be caused by a variety of factors, from hardware problems to software settings. By following the steps above, you should be able to identify the root cause and resolve the problem. If the issue persists, consider consulting a professional technician to check for hardware defects.
With these detailed steps, you can get your system back to normal and eliminate the frustration of unwanted scrolling.

