How to Customize Toolbars by Adding or Removing Buttons in Office
Microsoft Office applications like Word, Excel, and PowerPoint allow you to customize toolbars to fit your needs. By adding or removing buttons, you can make frequently used commands easily accessible and remove those you rarely use. Below is a step-by-step guide on how to customize toolbars in Office applications effectively.
Understanding Toolbars in Office
Microsoft Office applications primarily use the Quick Access Toolbar (QAT) and the Ribbon. Both are customizable:
- Quick Access Toolbar:
- Located at the top-left corner, it provides quick access to commonly used tools.
- Ribbon:
- Found at the top of the application, it is divided into tabs with groups of commands.
How to Add Buttons to the Quick Access Toolbar
Method 1: Using the Toolbar Dropdown Menu

- Locate the Quick Access Toolbar:
- It is above or below the Ribbon, depending on your settings.
- Click the Dropdown Arrow:
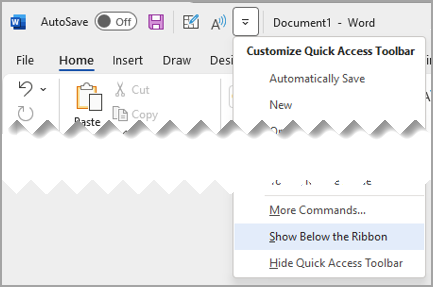
- On the right side of the toolbar, click the small dropdown arrow.
- Select Commands to Add:
- A list of commonly used commands will appear.
- Check the commands you want to add to the toolbar.
- Verify Changes:
- The selected buttons will appear on the toolbar.
Method 2: Adding Commands from the Ribbon

- Right-Click a Command:
- On the Ribbon, locate the button you want to add.
- Right-click the button.
- Choose “Add to Quick Access Toolbar”:
- Select this option from the context menu.
- The button will now appear in the Quick Access Toolbar.
Method 3: Accessing Advanced Customization Options
- Open Quick Access Toolbar Settings:
- Click the dropdown arrow on the toolbar and choose More Commands.
- Choose Commands:
- In the Customize the Quick Access Toolbar window, select commands from the list on the left.
- Add Commands:
- Click Add>> to move commands to the right-hand list.
- Rearrange Buttons:
- Use the Up and Down arrows to change the order of buttons.
- Click OK:
- Save your changes and close the window.

How to Remove Buttons from the Quick Access Toolbar
Method 1: Using the Toolbar Dropdown Menu
- Open the Toolbar Dropdown:
- Click the small dropdown arrow on the Quick Access Toolbar.
- Uncheck Commands:
- Deselect the commands you no longer need.
Method 2: Removing Buttons via Right-Click
- Right-Click a Button:
- Locate the button on the Quick Access Toolbar.
- Choose “Remove from Quick Access Toolbar”:
- The button will immediately be removed.

How to Customize the Ribbon
You can also add, remove, or rearrange buttons on the Ribbon for greater control.
- Open Ribbon Customization Options:
- Go to File > Options > Customize Ribbon.
- Choose a Tab:
- Select the Ribbon tab you want to modify.
- Add or Remove Commands:
- Use the Add>> or <<Remove buttons to edit the Ribbon.
- Create a New Tab or Group:
- Click New Tab to create a custom tab or group commands within an existing tab.
- Save Changes:
- Click OK to apply your changes.
Practical Example
Let’s say you frequently use the Track Changes feature in Word but find it cumbersome to navigate the Ribbon. Here’s how to add it to the Quick Access Toolbar:
- Open Word and navigate to the Review tab.
- Right-click the Track Changes button.
- Select Add to Quick Access Toolbar.
- The button will now appear at the top-left corner for easy access.
Illustration
Here is an example of customizing the Quick Access Toolbar:
The Quick Access Toolbar dropdown menu and the “More Commands” dialog box.
Common Issues and Solutions
- Can’t Find a Command:
- Use the search box in the Customize Ribbon or Quick Access Toolbar window to locate commands.
- Customization Not Saving:
- Ensure your Office application is updated.
- Save your changes before closing the options window.
- Reset to Default Settings:
- In the Customize Toolbar or Ribbon window, click Reset to restore the default layout.
Conclusion
Customizing the toolbars in Microsoft Office allows you to streamline your workflow and access frequently used tools with ease. By adding and removing buttons, you can tailor Word, Excel, and PowerPoint to suit your needs perfectly.
