How to Update the Product Key for Office 2019
Changing the product key for Microsoft Office 2019 may be necessary when transferring your license to a new computer, switching to a different type of license, or resolving activation issues. This guide provides a step-by-step explanation to help you change your product key quickly and effectively.
Step 1: Understand Why You May Need to Change the Product Key
Changing the product key might be required in these situations:
- You’ve upgraded your Office license and need to activate the new version.
- You’ve purchased a legitimate product key and need to replace an invalid one.
- You’ve transferred Office to another device and need to re-enter the product key.
Ensure you have your 25-character product key before proceeding. The product key usually looks like this: XXXXX-XXXXX-XXXXX-XXXXX-XXXXX.
Step 2: Change the Product Key Through Office Applications

Using Microsoft Word, Excel, or Any Office Application
- Open Any Office App
- Launch Word, Excel, or any other Office 2019 application on your computer.
- Go to the Account Settings
- Click on File in the top-left corner of the application.
- Select Account from the side menu.
- Access Product Key Options
- Look for the Product Information section.
- Click on Change Product Key (you may see this as Update Product Key depending on the version).
- Enter the New Product Key
- In the pop-up window, type your 25-character product key.
- Click Activate to validate and save the key.
Step 3: Change the Product Key via Command Prompt
This method is particularly useful if you encounter errors while trying to change the product key through the app interface.
- Run Command Prompt as Administrator
- Press Windows + S, type cmd, then right-click on Command Prompt and select Run as Administrator.
- Find the Office Installation Path
- Type the following command and press Enter:
If you have a 32-bit version of Office on a 64-bit OS, use:
- Type the following command and press Enter:
- Enter the New Product Key
- Replace
XXXXX-XXXXX-XXXXX-XXXXX-XXXXXwith your product key in the following command:
- Replace
- Activate Office
- Run the following command to activate the new product key:
- Verify the Key
- Check if the activation was successful by running:
Step 4: Change the Product Key Through Control Panel

- Open Control Panel
- Press Windows + S, type Control Panel, and open it.
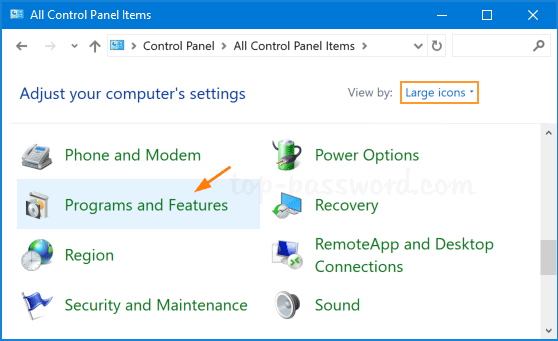
- Access Programs and Features
- Click on Programs > Programs and Features.
- Locate Microsoft Office 2019
- Find Office 2019 in the list of installed programs.
- Change or Repair
- Right-click on Office and select Change.
- In the setup wizard, look for the option to Enter a Product Key or Change Key.
- Enter the New Key
- Enter your new product key and complete the process.
Step 5: Verify the Activation Status

Once you’ve changed the product key, ensure that Office is successfully activated.
- Open Any Office App
- Open Word, Excel, or PowerPoint.
- Check Activation Status
- Go to File > Account.
- Look under Product Information for the activation status. If it says Product Activated, the process is complete.
Troubleshooting Common Issues
- Invalid Product Key Error: Double-check the key you entered for typos. Ensure the key is for Office 2019 and not another version.
- Activation Limit Reached: If the key has been used on too many devices, deactivate it from the older computer or contact Microsoft Support.
- Command Errors: Ensure you are running Command Prompt as an administrator and using the correct Office installation path.
Conclusion
Changing the product key in Office 2019 is a straightforward process, whether you do it through the app interface, Command Prompt, or Control Panel. Following these steps ensures you can update your license seamlessly and resolve activation issues. If problems persist, contacting Microsoft Support is always a good option.
