How to Add or Remove a Page Break in Word
Microsoft Word’s page break feature is essential for managing the structure of your document. Page breaks let you control where a new page begins, which is especially useful for formatting reports, books, or resumes. This guide explains how to insert and delete page breaks in Word, with step-by-step instructions and visuals.
What Is a Page Break?
A page break forces text to move to the next page, regardless of how much content is on the current page. This ensures your document maintains proper formatting and readability.
How to Insert a Page Break in Word
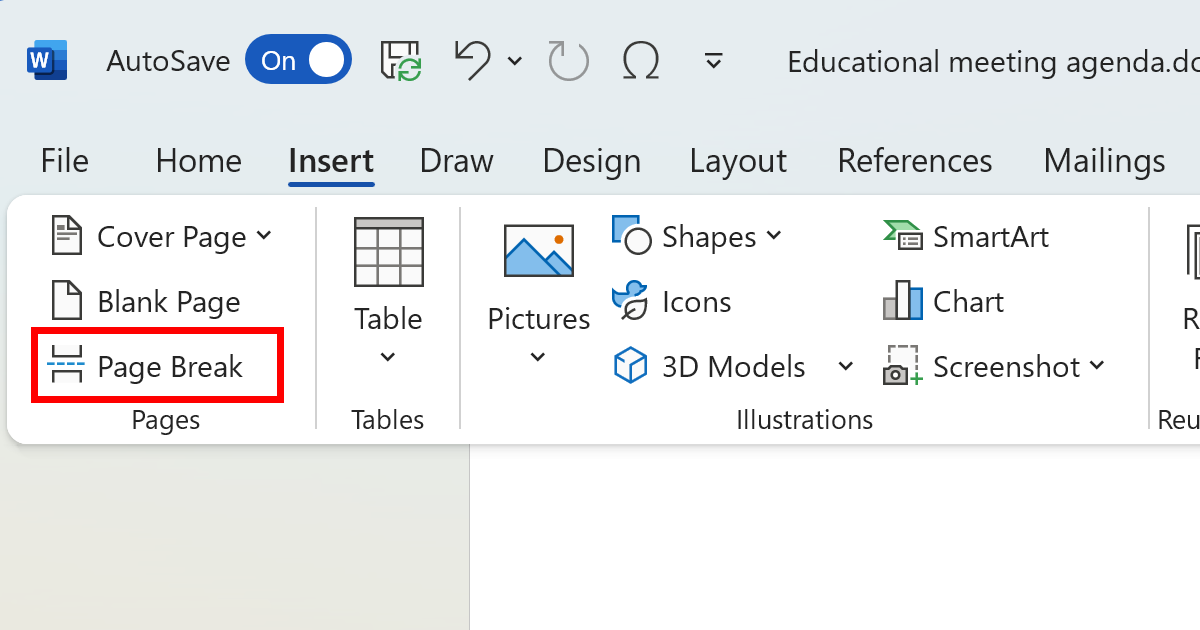
Method 1: Using the Insert Tab

- Place Your Cursor:
- Click where you want to start a new page.
- Go to the Insert Tab:
- On the Word ribbon at the top, click Insert.
- Insert the Page Break:
- In the Pages group, select Page Break.
- Verify the Break:
- The text after the cursor will move to a new page.
Method 2: Using the Keyboard Shortcut
- Position the Cursor:
- Place the cursor where you want the page break to appear.
- Use the Shortcut:
- Press Ctrl + Enter on your keyboard.
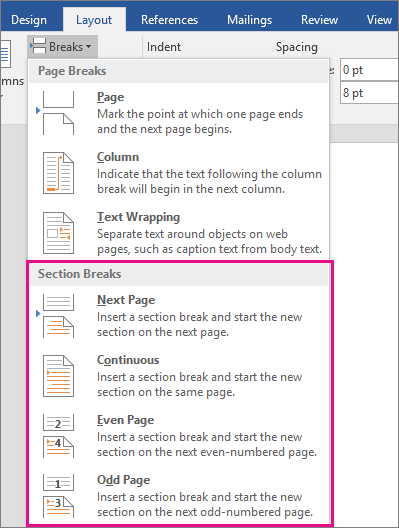
Method 3: Insert a Section Break for Advanced Formatting
If you need a new page with different formatting (like margins or orientation), use a section break:

- Place Your Cursor:
- Click where the section should begin.
- Open the Layout Tab:
- On the ribbon, click Layout.
- Choose a Break Type:
- In the Page Setup group, click Breaks.
- Select Next Page under Section Breaks.
How to Delete a Page Break in Word
Step 1: Display Non-Printing Characters
- Enable Paragraph Marks:
- Press Ctrl + Shift + 8, or click the ¶ icon in the Home tab.
- This reveals non-printing characters, including page breaks.
Step 2: Locate the Page Break
- Scroll through your document to find the Page Break line.
- It will appear as “——- Page Break ——-“.
Step 3: Delete the Page Break
- Click just before the Page Break line.
- Press Backspace or Delete on your keyboard.
How to Prevent Unwanted Page Breaks
Sometimes, Word automatically adds unwanted page breaks. You can fix this by adjusting paragraph settings:
- Select the Text:
- Highlight the paragraph causing the issue.
- Open Paragraph Settings:
- Right-click and select Paragraph, or go to the Home tab and click the small arrow in the Paragraph group.
- Adjust Line and Page Breaks:
- Go to the Line and Page Breaks tab.
- Uncheck options like Page break before or Keep with next.
- Click OK to save changes.
Practical Example
Let’s say you’re working on a report and want a new section to begin on a fresh page.
- Place the cursor at the start of the section.
- Press Ctrl + Enter to insert a page break.
- Use Ctrl + Shift + 8 to check if the page break is correctly placed.
- To remove it, click the Page Break line and press Delete.
Illustration
Below is a step-by-step visual representation of inserting and deleting a page break in Microsoft Word:
An example showing the “Insert Page Break” option and non-printing characters.
Common Troubleshooting Tips
- Issue: Page break doesn’t appear where expected.
Solution: Ensure the cursor is placed correctly before inserting the break. - Issue: Can’t delete a page break.
Solution: Enable non-printing characters to locate the page break. - Issue: Blank pages remain after deleting a page break.
Solution: Delete any leftover paragraph marks on the blank page.
Conclusion
Inserting and deleting page breaks in Microsoft Word is a simple but powerful tool for organizing your document. Whether you’re creating reports or formatting complex documents, mastering this feature will improve your productivity and enhance your document’s readability.
