How to Resolve the ‘We Couldn’t Create the Outlook Data File’ Error
The “We couldn’t create the Outlook data file” error is a common issue that users face when trying to set up or access their Outlook profile. This error can prevent you from sending or receiving emails and can be caused by various reasons such as a corrupted profile, incorrect file permissions, or conflicting software. In this guide, we will walk you through the steps to resolve this error effectively.
What Causes the ‘We Couldn’t Create the Outlook Data File’ Error?
There are several reasons why this error might occur:
- Corrupted Outlook Profile: If your Outlook profile is corrupted, it may prevent the creation of the data file.
- Permissions Issues: Insufficient permissions to the folder where Outlook stores its data file may trigger the error.
- Antivirus or Firewall Conflicts: Security software like antivirus programs or firewalls can interfere with Outlook’s ability to create the necessary data files.
- Incorrect Settings: Incorrect account settings or file paths can also lead to this issue.
- File Location Issues: The location of the data file may be corrupted or inaccessible.
How to Fix the ‘We Couldn’t Create the Outlook Data File’ Error
Here are several solutions you can try to resolve this issue:
Solution 1: Create a New Outlook Profile

A corrupted Outlook profile can be the root cause of the error. Creating a new profile can often fix the issue.
Steps to Create a New Outlook Profile:
- Open Control Panel:
- Press Windows + R, type control, and hit Enter.
- Navigate to Mail Settings:
- In the Control Panel, click on Mail.
- Click on Show Profiles:
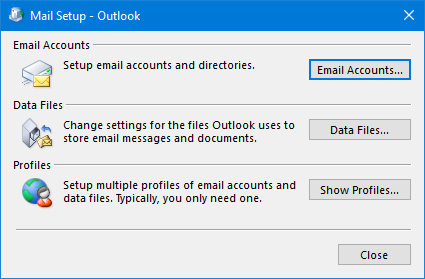
- In the Mail Setup window, click on Show Profiles.
- Add a New Profile:
- Click on Add, then enter a name for the new profile and click OK.
- Configure the Email Account:
- Follow the prompts to add your email account to the new profile.
- Set the New Profile as Default:
- Once the new profile is created, set it as the default by selecting it and clicking Set as Default.
Solution 2: Check Permissions for the Data File

If Outlook is unable to create the data file due to permissions issues, you will need to check the permissions for the folder where the data file is stored.
Steps to Check Permissions:
- Locate the Data File:
- By default, the data file is located in C:\Users\YourUsername\AppData\Local\Microsoft\Outlook.
- Right-Click the Folder:
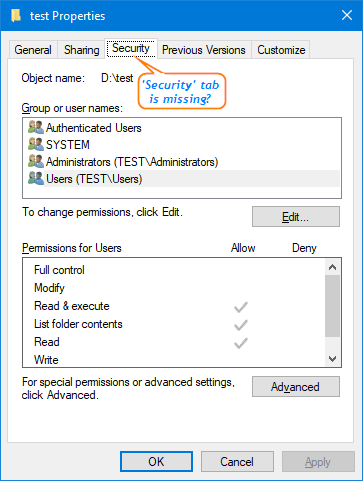
- Right-click the folder and select Properties.
- Check Permissions:
- Under the Security tab, check that your user account has full control of the folder.
- Adjust Permissions if Necessary:
- If your account does not have full control, click Edit, select your account, and check the box for Full Control.
- Apply Changes:
- Click Apply and then OK.
Solution 3: Repair Your Outlook Installation

Outlook might not function properly if its installation is corrupted. Running a repair can fix issues with the program’s files.
Steps to Repair Outlook:
- Open Control Panel:
- Press Windows + R, type control, and hit Enter.
- Go to Programs and Features:
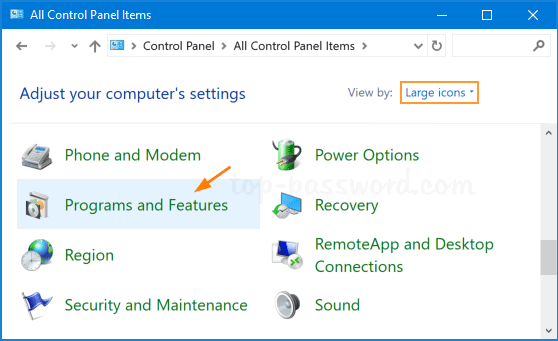
- Click on Programs, then Programs and Features.
- Select Microsoft Office:
- Find Microsoft Office in the list, click on it, and select Change.
- Choose Repair:
- In the window that appears, select Repair and follow the on-screen instructions.
Solution 4: Disable Antivirus or Firewall Temporarily
Sometimes, antivirus programs or firewalls block Outlook from creating data files. Disabling them temporarily can help identify if they are the cause of the issue.
Steps to Disable Antivirus or Firewall:
- Temporarily Disable Antivirus:
- Open your antivirus software and look for the option to disable it temporarily.
- Disable Windows Firewall:
- Open Control Panel, go to System and Security, and click on Windows Firewall. Select Turn Windows Firewall on or off and choose to turn it off temporarily.
- Check Outlook:
- After disabling the antivirus and firewall, restart Outlook and check if the issue persists.
Note: Be sure to enable your antivirus and firewall again after testing.
Solution 5: Use the Inbox Repair Tool

Outlook includes a built-in tool called the Inbox Repair Tool (Scanpst.exe) that can fix corrupted Outlook data files.
Steps to Use the Inbox Repair Tool:
- Locate the Scanpst.exe Tool:
- Navigate to C:\Program Files (x86)\Microsoft Office\root\OfficeXX, where XX is the version number of your Office installation.
- Run Scanpst.exe:
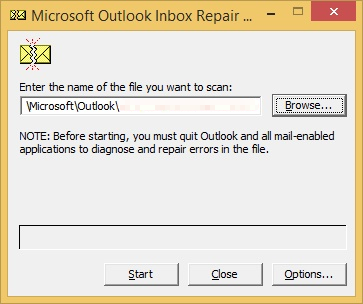
- Double-click the Scanpst.exe file to open the tool.
- Browse to the Outlook Data File:
- In the Inbox Repair Tool, browse to the location of your Outlook data file (usually located in C:\Users\YourUsername\AppData\Local\Microsoft\Outlook).
- Start the Repair Process:
- Click Start to begin the repair. Once the process is complete, check if the issue is resolved.
Conclusion
The “We couldn’t create the Outlook data file” error can be caused by several factors, including corrupted profiles, incorrect permissions, or conflicts with antivirus software. By following the steps outlined above, you can resolve the issue and restore normal functionality to Outlook.
If the issue persists after trying these methods, it may be necessary to contact Microsoft Support for further assistance.
Illustration
Here’s a screenshot showing how to create a new Outlook profile from the Mail Setup window:
This image shows the process of adding a new Outlook profile in the Mail Setup window.
