Steps to Eliminate Duplicates in Excel

Managing data effectively in Excel often requires identifying and removing duplicates. Duplicates can skew analysis and lead to incorrect conclusions, making it crucial to know how to find and eliminate them. This comprehensive guide will walk you through various methods to remove duplicates in Excel, ensuring your data remains clean and accurate.
1. Why Remove Duplicates in Excel?
Duplicates can arise from data entry errors, merging datasets, or other data collection methods. Removing duplicates is essential for several reasons:
- Accuracy: Duplicate data can distort your analysis and lead to misleading insights.
- Efficiency: Reducing redundant data can make your Excel files smaller and easier to manage.
- Data Integrity: Ensures that your datasets are unique and consistent, maintaining data integrity for reporting and analysis.
Understanding the importance of removing duplicates is the first step toward maintaining a clean and reliable dataset.
2. Using Excel’s Built-In ‘Remove Duplicates’ Tool
Excel offers a built-in tool specifically designed to remove duplicate entries in a few simple steps.
Step-by-Step Guide:
- Select Your Data Range:
- Click and drag to highlight the range of cells you want to check for duplicates. Ensure the selection includes all the relevant data.
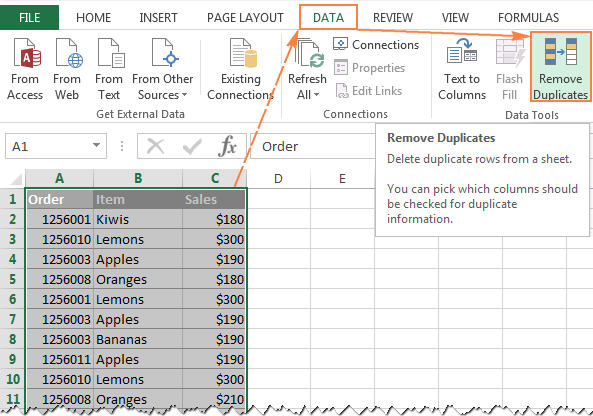
- Go to the ‘Data’ Tab:
- Navigate to the “Data” tab on the Excel ribbon.
- Click on ‘Remove Duplicates’:
- In the “Data Tools” group, click the “Remove Duplicates” button.
- Choose Columns to Check:
- A dialog box will appear, listing all columns in the selected range. Check or uncheck columns to specify which ones to check for duplicates.
- For example, if you want to remove duplicates based on the “Email” column, only check that column.
- Click ‘OK’ to Remove Duplicates:
- Excel will remove the duplicate entries based on your selections and display a message showing how many duplicates were removed.

3. Highlighting Duplicates Using Conditional Formatting
Conditional Formatting in Excel allows you to highlight duplicates so you can review them before removal.
Step-by-Step Guide:
- Select Your Data Range:
- Highlight the cells where you want to find duplicates.
- Go to the ‘Home’ Tab:
- Click on the “Home” tab on the Excel ribbon.
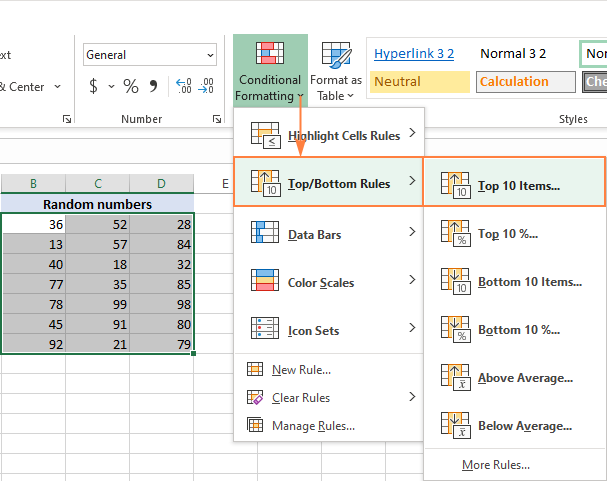
- Click on ‘Conditional Formatting’:
- In the “Styles” group, click “Conditional Formatting” > “Highlight Cells Rules” > “Duplicate Values…”
- Choose Duplicate Highlighting Options:
- In the dialog box, choose how to format duplicate values (e.g., light red fill with dark red text).
- Click ‘OK’:
- Excel will highlight all duplicate entries in the selected range, allowing you to review them before deciding to remove or keep them.
4. Removing Duplicates with Advanced Filter

The Advanced Filter option in Excel provides more control over how duplicates are removed, particularly when dealing with large datasets.
Step-by-Step Guide:
- Select Your Data Range:
- Click and drag to select the range of data.
- Go to the ‘Data’ Tab:
- Navigate to the “Data” tab on the ribbon.
- Click on ‘Advanced’:
- In the “Sort & Filter” group, click the “Advanced” button.
- Set Up the Advanced Filter Criteria:
- In the Advanced Filter dialog box, select “Copy to another location.”
- Specify the “Copy to” range where you want to paste the filtered data without duplicates.
- Check the box “Unique records only” and click “OK.”
- Review the Filtered Data:
- Excel will display the data in the new location, excluding duplicates based on your criteria.

5. Using Excel Formulas to Identify Duplicates
Excel formulas can also help identify duplicates by flagging them with a simple function.
Step-by-Step Guide:
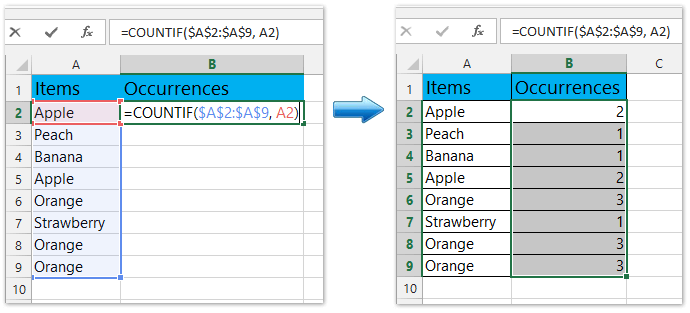
- Use the COUNTIF Function:
- Click on an empty cell next to your data range.
- Enter the formula:
=COUNTIF($A$2:$A$10, A2)>1(assuming your data is in cells A2 to A10).
- Drag the Formula Down:
- Drag the fill handle down to apply the formula to other cells. This formula will return TRUE for duplicates.
- Filter or Sort by TRUE Values:
- You can now filter or sort by the TRUE values to identify and remove duplicates.

6. Best Practices for Managing Duplicates in Excel
To effectively manage and remove duplicates in Excel, consider the following best practices:
- Regular Data Cleaning: Make it a habit to regularly clean your datasets to prevent duplicate entries from accumulating.
- Backup Data Before Deletion: Always create a backup of your data before removing duplicates to prevent accidental data loss.
- Use Multiple Methods: Combine various methods like Conditional Formatting and the Remove Duplicates tool to ensure all duplicates are identified and handled.
Conclusion
Removing duplicates in Excel is a fundamental data management task that ensures accuracy and integrity in your datasets. Whether you use Excel’s built-in tools, conditional formatting, advanced filters, or formulas, the methods outlined in this guide will help you clean your data effectively. By regularly maintaining your Excel sheets and using these techniques, you can ensure your data remains reliable and ready for analysis. For more advanced data cleaning techniques, consider exploring Excel’s Power Query or VBA scripting options, or consult further resources on data management in Excel.
