Excel Expertise: How to Efficiently Identify Duplicates in Excel

Excel is a powerful tool for managing and analyzing data, but duplicate entries can often clutter your data sets and lead to inaccuracies. Identifying and removing duplicates in Excel is crucial for maintaining data integrity and ensuring accurate analysis. This comprehensive guide will teach you how to find duplicates in Excel like a pro, using various methods and tools. From simple highlighting to advanced functions, you’ll learn everything you need to keep your spreadsheets clean and organized.
1. Why Finding Duplicates in Excel is Important
Duplicates in Excel can cause several issues, including incorrect calculations, misleading analysis, and data inconsistencies. Detecting and removing duplicates is essential for several reasons:
- Data Accuracy: Ensure your data is accurate and reliable by removing redundant entries.
- Efficient Analysis: Clean data allows for more effective data analysis and reporting.
- Improved Performance: Reducing data clutter improves Excel’s performance and makes your worksheets easier to manage.
Understanding the importance of finding duplicates helps maintain data integrity and enhances your analytical capabilities.
2. Using Conditional Formatting to Highlight Duplicates

One of the quickest ways to find duplicates in Excel is by using Conditional Formatting. This feature allows you to highlight duplicate values, making them easy to spot.
Step-by-Step Guide to Using Conditional Formatting:
- Select the Data Range:
- Highlight the range of cells where you want to find duplicates.
- Go to the ‘Home’ Tab:
- Click on the “Home” tab on the Excel ribbon.
- Click on ‘Conditional Formatting’:
- In the “Styles” group, click “Conditional Formatting.”
- Choose ‘Highlight Cells Rules’ > ‘Duplicate Values’:
- From the dropdown menu, select “Highlight Cells Rules” and then choose “Duplicate Values.”
- Set the Formatting Style:
- Choose the formatting style you prefer (e.g., Light Red Fill with Dark Red Text).
- Click ‘OK’ to Apply:
- Click “OK” to apply the formatting. Duplicate values will now be highlighted in your chosen style.
3. Removing Duplicates Using the ‘Remove Duplicates’ Tool

Excel provides a built-in tool to quickly remove duplicate entries from a data set. This method is ideal when you want to keep only unique values in a specific range or column.
Step-by-Step Guide to Using the Remove Duplicates Tool:
- Select the Data Range:
- Highlight the range of cells or select the entire table where you want to remove duplicates.
- Go to the ‘Data’ Tab:
- Click on the “Data” tab on the Excel ribbon.
- Click on ‘Remove Duplicates’:
- In the “Data Tools” group, click “Remove Duplicates.”
- Choose Columns to Check for Duplicates:
- In the “Remove Duplicates” dialog box, select the columns you want to check for duplicates. You can choose one or multiple columns.
- Click ‘OK’ to Remove Duplicates:
- Click “OK” to remove duplicates. Excel will display a message showing how many duplicates were removed and how many unique values remain.
4. Using Excel Functions to Find Duplicates

For more advanced users, Excel offers several functions to find duplicates, such as COUNTIF, IF, and VLOOKUP.
4.1 Using COUNTIF Function to Identify Duplicates
The COUNTIF function counts the number of times a value appears in a specified range, which is useful for identifying duplicates.
Step-by-Step Guide to Using COUNTIF:
- Select a New Column for Results:
- Choose a new column next to your data to display the results.
- Enter the COUNTIF Formula:
- In the first cell of the new column, enter the formula:
=COUNTIF(A:A,A2)=COUNTIF(A:A, A2)Replace
A:Awith your data range andA2with the starting cell of the range. - Drag the Formula Down:
- Drag the fill handle down to apply the formula to the rest of the column. Any value greater than 1 indicates a duplicate.
4.2 Using VLOOKUP to Compare Lists

VLOOKUP can be used to compare two lists and identify duplicates between them.
Step-by-Step Guide to Using VLOOKUP:
- Prepare Your Data:
- Ensure both lists are in the same worksheet or accessible ranges.
- Enter the VLOOKUP Formula:
- In a new column, enter the formula:
=IF(ISNA(VLOOKUP(A2,B:B,1,FALSE)),”Unique”,”Duplicate”)=IF(ISNA(VLOOKUP(A2, B:B, 1, FALSE)), “Unique”, “Duplicate”)Replace
A2with the first value of your list andB:Bwith the range of the second list. - Analyze the Results:
- The formula returns “Duplicate” for duplicates and “Unique” for unique values.
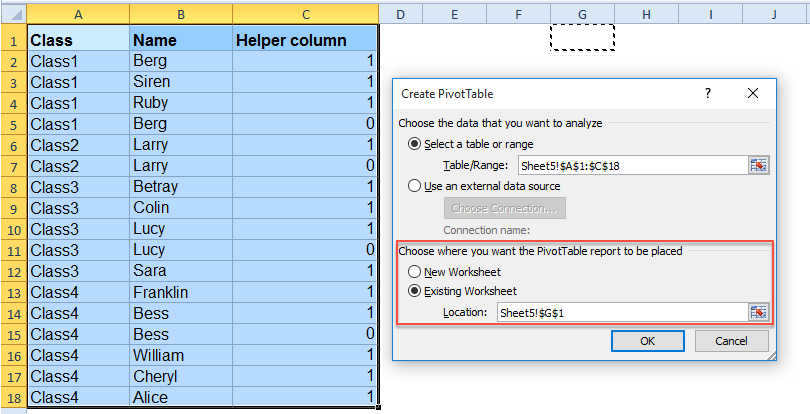
5. Advanced Techniques: Using PivotTables to Find Duplicates

PivotTables provide an advanced way to analyze data and find duplicates based on multiple criteria.
Step-by-Step Guide to Using PivotTables:
- Select Your Data Range:
- Highlight the data you want to analyze for duplicates.
- Go to ‘Insert’ > ‘PivotTable’:
- Click on the “Insert” tab and select “PivotTable.”
- Set Up the PivotTable:
- In the PivotTable field list, drag the column you want to analyze into the “Rows” and “Values” areas.
- Count Occurrences:
- Ensure the “Values” area is set to “Count” to see how many times each entry appears.
- Analyze Duplicates:
- Entries with a count greater than 1 indicate duplicates.
6. Best Practices for Managing Duplicates in Excel
To effectively manage duplicates in Excel, consider these best practices:
- Regularly Clean Your Data: Periodically check for duplicates, especially when importing or merging data.
- Use Conditional Formatting Sparingly: While helpful, overusing conditional formatting can clutter your worksheet.
- Validate Data on Entry: Implement data validation rules to prevent duplicates from being entered in the first place.
- Keep a Backup: Always keep a backup of your original data before removing duplicates.
Conclusion
Finding and removing duplicates in Excel is crucial for maintaining clean, accurate data. By mastering various techniques—from simple highlighting to advanced functions and PivotTables—you can efficiently manage duplicates and enhance your data analysis skills.
Following the steps and best practices outlined in this guide will help you become proficient in handling duplicates, ensuring your Excel spreadsheets are reliable and error-free. For more advanced Excel features and functions, consider exploring additional resources or joining Excel training programs to further improve your data management capabilities.
