Disabling Auto-Correct in Microsoft Word
Microsoft Word’s AutoCorrect feature is designed to save time by automatically correcting typos, capitalization errors, and other common mistakes as you type. However, there are situations where AutoCorrect might not be helpful—such as when it incorrectly changes words or interferes with technical or specialized writing. This guide will show you how to disable AutoCorrect in Microsoft Word or customize its behavior to suit your needs.
Accessing AutoCorrect Settings
To disable AutoCorrect or customize its options, follow these steps:
- Open Microsoft Word
Launch Microsoft Word on your computer. - Navigate to Options
- Click on the File tab located in the top-left corner of the Word window.
- From the menu, select Options at the bottom.
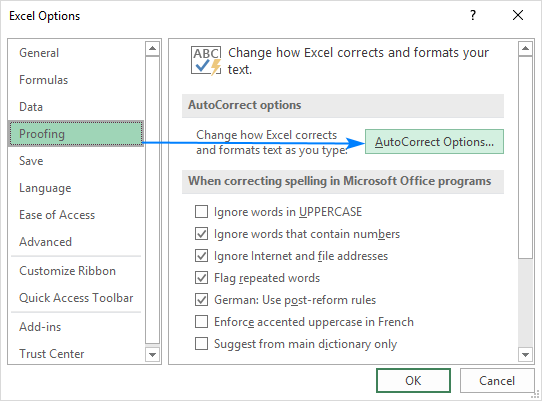
- Go to Proofing Settings
- In the Word Options window, click Proofing in the left-hand menu.
- Click the AutoCorrect Options button under the “AutoCorrect options” section.
Disabling Common AutoCorrect Features
In the AutoCorrect settings menu, you’ll find several tabs that control different aspects of AutoCorrect. Here’s how to adjust them:

Disabling Text Replacement
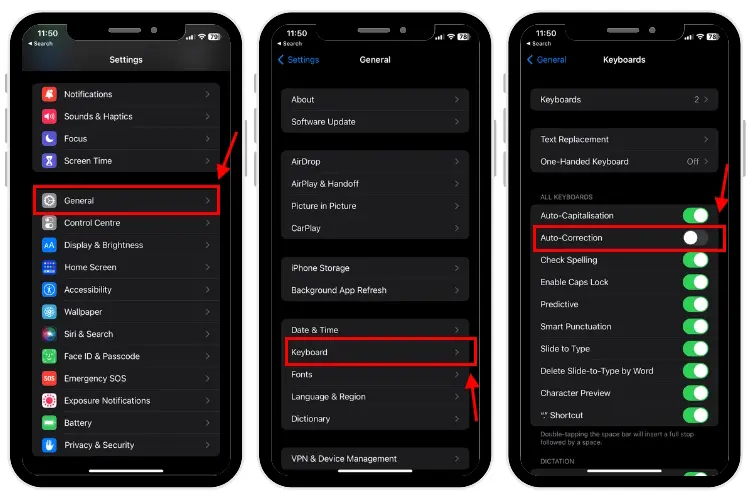
- Turn Off Replace Text As You Type
- Under the AutoCorrect tab, look for the Replace text as you type checkbox.
- Uncheck this box to stop Word from automatically replacing text based on the default list.
- Remove Specific AutoCorrect Entries
- If you want to stop Word from changing certain words (e.g., changing “teh” to “the”), scroll through the list of predefined entries.
- Select the entry you want to remove and click Delete.
Disabling AutoCorrect for Capitalization
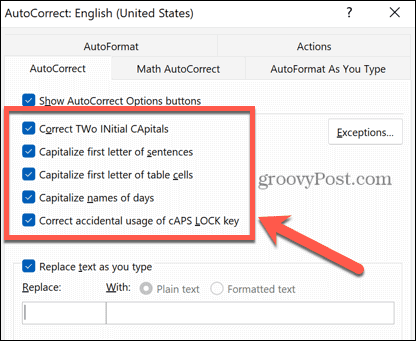
If Word’s automatic capitalization corrections aren’t helpful, you can disable these as well:
- Uncheck Capitalization Options
- Under the AutoCorrect tab, you’ll see several options related to capitalization, such as:
- Correct Two Initial Capitals
- Capitalize First Letter of Sentences
- Capitalize First Letter of Table Cells
- Uncheck any of these boxes to disable the specific feature.
- Under the AutoCorrect tab, you’ll see several options related to capitalization, such as:
Disabling AutoFormatting
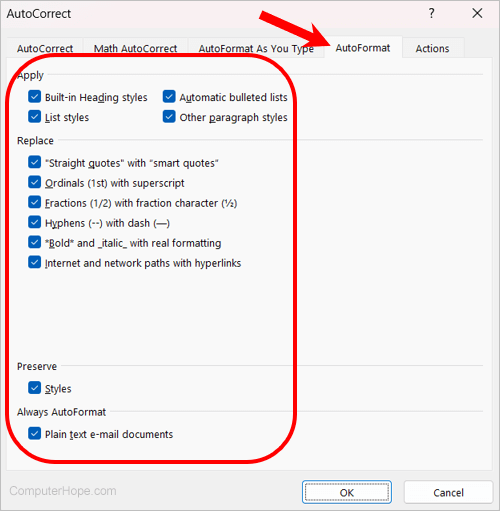
The AutoFormat feature can also interfere with your work by automatically applying formatting changes:
- Open the AutoFormat As You Type Tab
- In the AutoCorrect Options dialog box, click the AutoFormat As You Type tab.
- Turn Off Specific Formatting Options
- Uncheck features such as:
- Automatic numbered lists
- Automatic bulleted lists
- Replace fractions with fraction characters
- These changes will prevent Word from automatically formatting your text as you type.
- Uncheck features such as:
Customizing AutoCorrect for Specific Needs
If you don’t want to turn off AutoCorrect entirely, you can customize it to better suit your requirements:
- Add Your Own Entries
- In the AutoCorrect tab, you can add your own text replacements. For example, you could set “omw” to automatically expand to “on my way.”
- Disable AutoCorrect for Specific Words
- Remove any specific words or corrections that interfere with your work by deleting entries in the replacement list.
Restoring AutoCorrect If Needed
If you decide later that you want to re-enable AutoCorrect, you can easily do so:
- Recheck AutoCorrect Options
- Follow the same steps to access the AutoCorrect settings.
- Re-enable the options you previously unchecked.
- Reset Default Settings
- If you’ve made extensive changes and want to return to the original AutoCorrect settings, click Reset All (if available) or manually re-enable the default features.
Conclusion
AutoCorrect is a powerful feature in Microsoft Word, but it isn’t always appropriate for every writing situation. By following the steps above, you can disable AutoCorrect entirely, fine-tune its behavior, or even create your own custom rules. These adjustments will ensure a smoother and more tailored Word experience, whether you’re writing formal documents, technical papers, or creative content.
