How to Configure an Email Account in Microsoft Outlook
Microsoft Outlook is one of the most widely used email clients worldwide, offering a comprehensive suite of tools to help users manage emails, contacts, calendars, and tasks in one place. Whether you’re using Outlook for personal, academic, or professional purposes, adding an email account is one of the first steps toward using the platform effectively. This guide will walk you through the process of adding your email account to Outlook, making it easier to stay connected and organized.
Step 1: Open Microsoft Outlook
The first step in adding your email account to Microsoft Outlook is launching the application.
1. Open Microsoft Outlook
- Start by opening the Microsoft Outlook application on your computer.
- If this is your first time setting up Outlook, you will likely be prompted to add an email account as soon as you open the application.
2. Navigate to Account Settings
- If Outlook does not prompt you to add an email, you can manually add your account.
- Click the File tab in the top-left corner of the screen to open the Account Settings menu.
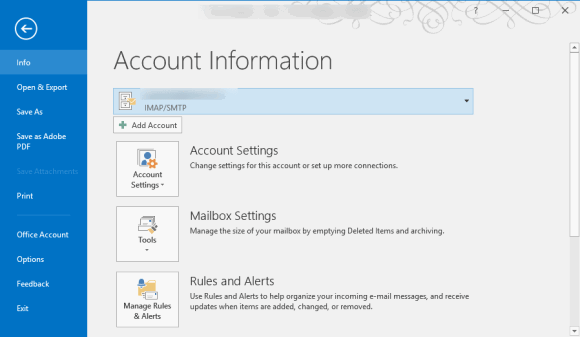
- In the Account Settings dropdown, click Account Settings once again to open the email account configuration options.

Step 2: Add a New Email Account
Now that you’re in the Account Settings menu, let’s move on to the process of adding your email account.
1. Click the ‘New’ Button
- In the Account Settings window, locate and click the New button under the Email tab. This option will allow you to add a new email account to Outlook.
2. Choose the Email Provider
- Outlook supports a wide range of email services, including:
- Microsoft Exchange
- Outlook.com
- Microsoft 365
- Gmail
- Yahoo Mail
- Other Email Accounts (IMAP, POP)
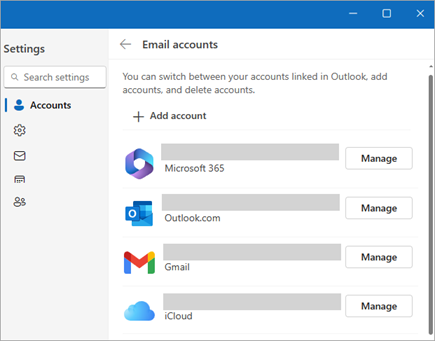
- Select the appropriate email provider for the account you want to add. If you’re using a common email provider like Gmail or Yahoo, simply select IMAP or POP depending on your preferences.
- If you are using Microsoft Exchange, select that option.
Step 3: Enter Email Account Information
After selecting your email provider, you’ll need to input your email account information.
1. Enter Your Email Address
- Enter the full email address of the account you wish to add. Make sure it’s typed correctly to avoid errors.
2. Choose Account Type: IMAP or POP
- IMAP (Internet Message Access Protocol): IMAP is ideal if you want to keep your emails synchronized across multiple devices. This is the recommended option for most email providers.
- POP (Post Office Protocol): POP downloads emails from the server and stores them on your local device. This option is useful if you only want to access your emails on a single device.
- Tip: If you are unsure which to choose, IMAP is the best option for most modern email services.
3. Enter Your Password
- After entering your email address, Outlook will prompt you for the password associated with your email account. Input your password carefully.
- If your email provider uses two-factor authentication (2FA), make sure you follow the instructions to verify your identity.
Step 4: Configure Server Settings (If Necessary)
While Outlook typically detects your email provider’s settings automatically, there may be instances where you need to configure the server settings manually.
1. Enter Incoming and Outgoing Mail Server Information
- If Outlook does not auto-detect the server settings, you will need to enter the details manually. You will need the following information:
- Incoming Mail Server (IMAP or POP): This is the server used to download your emails.
- Outgoing Mail Server (SMTP): This is the server used to send your emails.
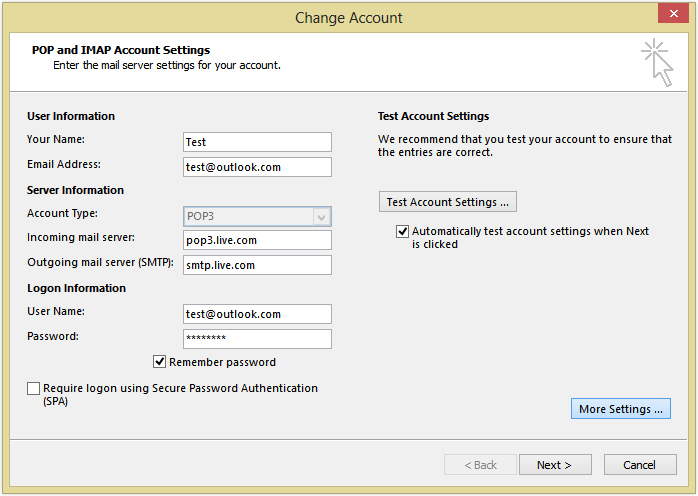
- You can find this information on your email provider’s support page or documentation. If you’re using Gmail, Outlook, or another major service, this information is readily available online.
2. Enable Encryption (SSL/TLS)
- Ensure that SSL (Secure Socket Layer) or TLS (Transport Layer Security) encryption is enabled for both incoming and outgoing mail servers. This ensures that your email data remains secure.
- Most email services support SSL or TLS encryption by default.
Step 5: Test Account Settings
Once you have entered all the necessary information, Outlook will automatically test your account settings to make sure everything is working properly.
1. Click the ‘Test Account Settings’ Button
- After entering the server information, click the Test Account Settings button.
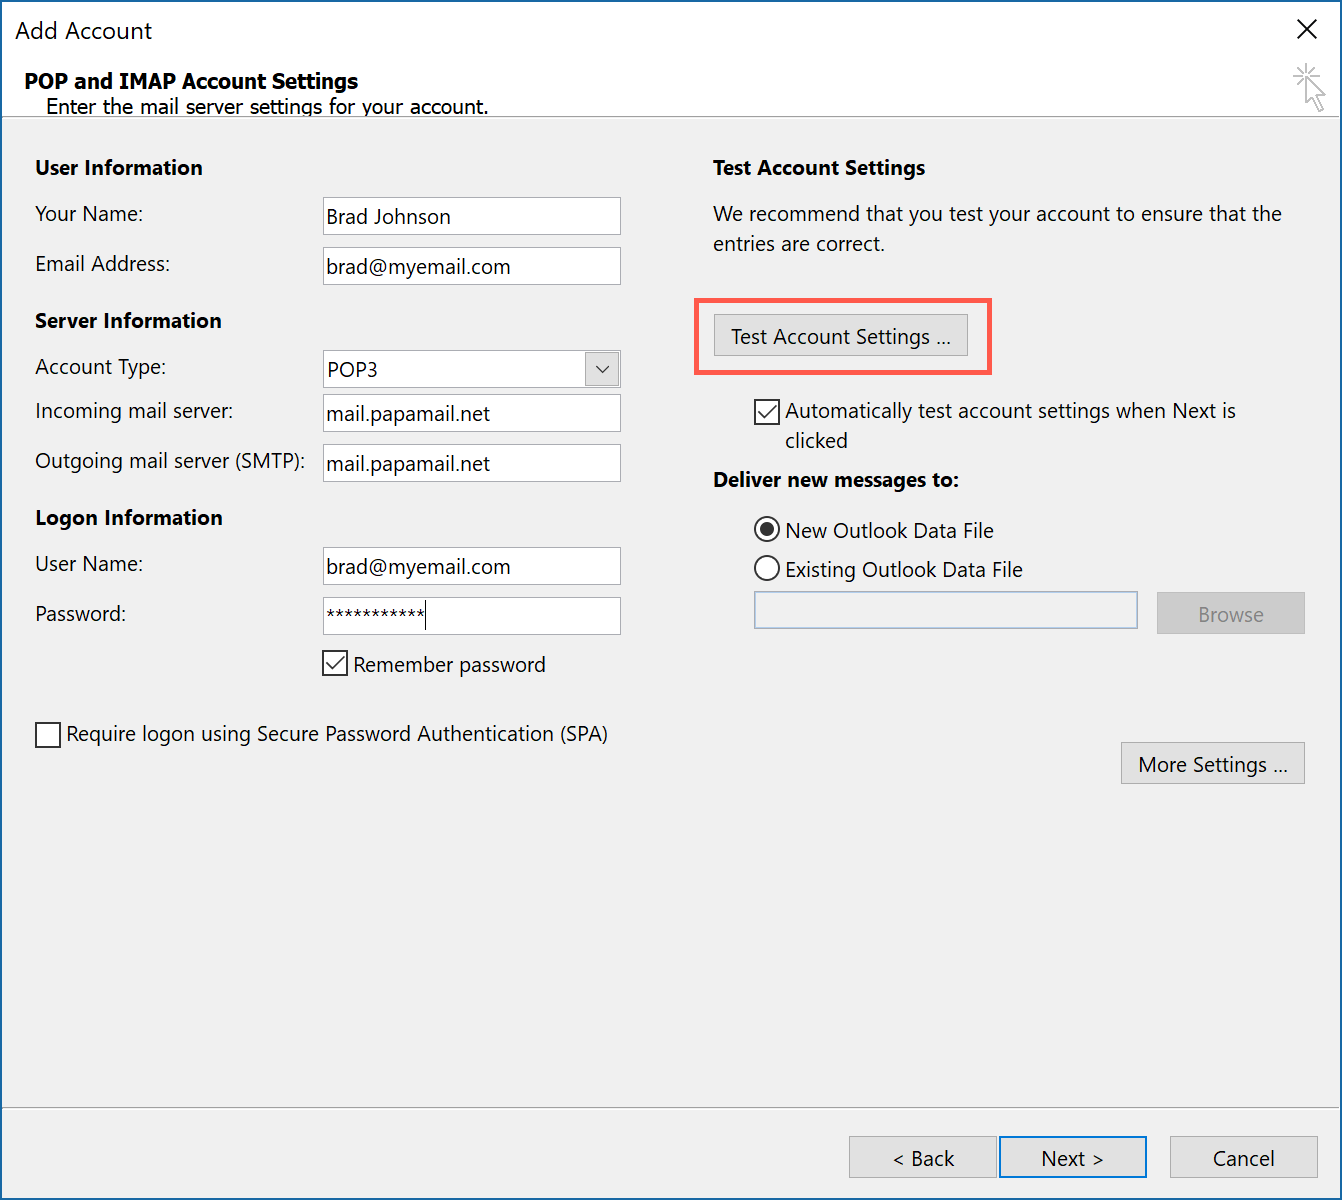
- Outlook will attempt to connect to the email provider’s server and verify the account details. If the test is successful, you will see a confirmation message indicating that the account is configured properly.
2. Fix Any Errors
- If Outlook encounters any errors during the test, double-check the email address, password, and server settings you entered. Make sure they match your email provider’s settings.
- If you still face issues, check your internet connection or firewall settings, which could be preventing Outlook from connecting to the server.
Step 6: Complete the Setup
Once the test is successful, you can complete the account setup.
1. Click Finish
- After the test is successful, click the Finish button to complete the setup process.
2. Return to Outlook
- After you finish the setup, Outlook will return to the main interface, and your new email account will be listed in the left-hand panel under Folders.
- You should now be able to send, receive, and manage your emails from within the Outlook application.
Step 7: Customize Your Account Settings
Once your email account is added, you can personalize the settings to suit your needs.
1. Set Up Folders
- Organize your inbox by creating folders for different types of emails (e.g., Work, Personal, Important). Right-click on your email account and select New Folder to create custom folders.
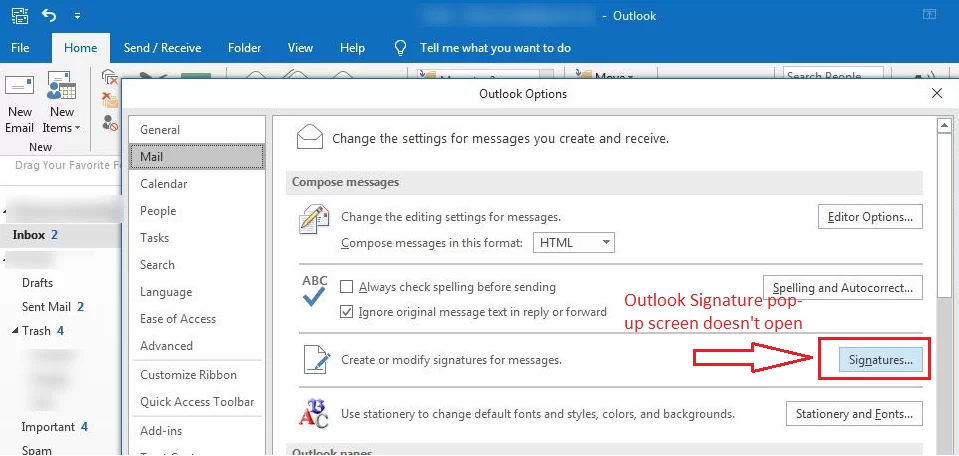
2. Set Up Email Signatures
- To add a professional touch to your emails, set up an email signature. Go to File > Options > Mail, and then click Signatures to create a new signature.
3. Sync Calendar and Contacts
- Ensure that your email account is synced with your Outlook Calendar and Contacts by going to File > Account Settings > Account Settings, selecting the email account, and enabling sync options.
Troubleshooting Common Issues
1. Email Settings Not Detected Automatically
- If Outlook fails to detect the correct settings automatically, you can manually configure the incoming and outgoing mail servers. Look up the specific server information for your email provider.
2. Unable to Send or Receive Emails
- If you are unable to send or receive emails, check your email account’s server settings, password, and internet connection. Make sure the settings are correct.
3. Frequent Password Prompts
- If Outlook repeatedly asks for your password, there may be an issue with your credentials. Double-check that your password is entered correctly and that two-factor authentication isn’t causing issues.
Conclusion
Adding an email account to Microsoft Outlook is an easy and effective way to manage all your communication in one place. By following the steps outlined above, you can set up your email account and customize Outlook to suit your needs. Whether you’re using Outlook for personal or professional purposes, the program offers a wealth of features to help you stay organized and on top of your tasks.
