How to Assign Categories, Flags, Reminders, or Colors in Outlook
Microsoft Outlook offers several powerful features to help you organize your emails, tasks, and calendar entries effectively. Categories, flags, reminders, and colors are tools that allow you to prioritize, track, and organize your Outlook items with ease. This guide will provide step-by-step instructions for using these features in Outlook across desktop, web, and mobile platforms.
Why Use Categories, Flags, Reminders, and Colors?
Using these features in Outlook can improve your productivity in several ways:
- Categories: Group and label emails, tasks, and calendar events for better organization.
- Flags: Mark items for follow-up and keep track of important tasks.
- Reminders: Stay on top of deadlines and appointments with timely notifications.
- Colors: Highlight and differentiate items visually for easier navigation.
How to Set Categories in Outlook
What Are Categories?
Categories in Outlook allow you to assign color-coded labels to emails, calendar events, contacts, and tasks. This helps you group similar items for better visibility and organization.
Step 1: Assign Categories to Emails
- Open the Outlook desktop app or web version.
- Right-click on the email you want to categorize.
- Hover over the Categorize option.
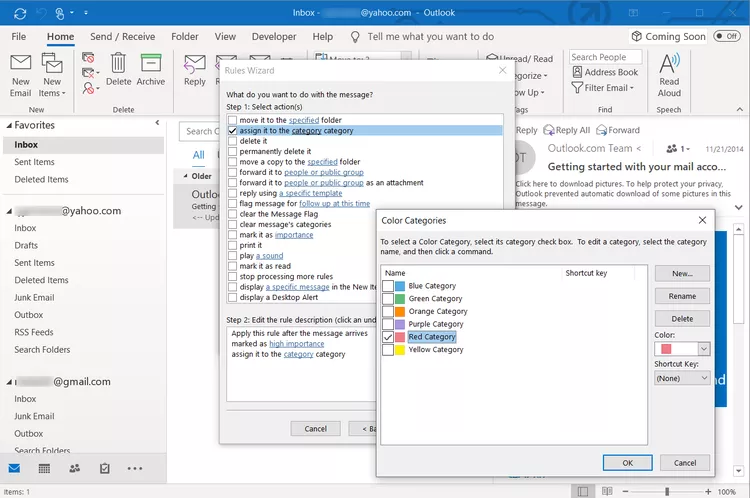
- Select a category from the list, or click All Categories to create or customize a new one.

Step 2: Assign Categories to Calendar Events
- Open your Outlook calendar.
- Right-click on an event or meeting.
- Select Categorize and choose a category.

Step 3: Customize Categories
- Click on Categorize > All Categories (in the desktop app).
- Rename or add new categories by clicking New or editing existing ones.
- Assign specific colors to each category for visual distinction.

How to Set Flags in Outlook
What Are Flags?
Flags are a useful feature for marking emails or tasks that require follow-up or action. Once flagged, an email or task will appear in your task list for easy tracking.
Step 1: Flag Emails for Follow-Up
- In your inbox, hover over the email you want to flag.
- Click the Flag icon next to the email subject.
- Select a due date from the dropdown menu (e.g., Today, Tomorrow, This Week).
Step 2: View Flagged Items
- Go to the Tasks or To-Do section in Outlook.
- All flagged items will appear here, along with their due dates.
Step 3: Clear Flags
- Once a task is complete, right-click the flag and select Mark Complete.
- This removes the flag and marks the item as done.
How to Set Reminders in Outlook
What Are Reminders?
Reminders are alerts that notify you of important tasks, events, or deadlines. They help ensure you never miss a critical item in your calendar or inbox.
Step 1: Add Reminders to Emails
- Right-click on an email and select Follow-Up.
- Click Add Reminder from the dropdown menu.
- Set the reminder date and time, then click OK.
Step 2: Add Reminders to Calendar Events
- Open or create a calendar event.
- In the event window, find the Reminder dropdown menu.
- Choose how far in advance you want the reminder to appear (e.g., 15 minutes, 1 hour).
Step 3: Dismiss or Snooze Reminders
When a reminder appears, you can either:
- Click Dismiss to close it.
- Click Snooze to delay the alert by a specified time.
How to Use Colors in Outlook
What Are Colors in Outlook?
Colors help visually differentiate items in your inbox, calendar, or task list. They are especially useful when combined with categories or flagged items.
Step 1: Color-Code Calendar Events
- Open the Outlook calendar.
- Right-click on an event.
- Select Categorize and choose a color from the list.
Step 2: Apply Colors to Tasks
- Go to the Tasks section in Outlook.
- Click on a task, then assign a category to it.
- The task will inherit the color associated with that category.
How to Use These Features on Outlook Mobile
On the Outlook mobile app, you can also manage categories, flags, and reminders.
Setting Categories on Mobile
- Open an email or event.
- Tap the Menu icon (three dots) and select Categorize.
- Choose a category from the list or create a new one.
Flagging Emails on Mobile
- Swipe right on an email in your inbox.
- Tap the Flag icon to mark it for follow-up.
Adding Reminders on Mobile
- Open the event or email you want to set a reminder for.
- Tap the Menu icon and choose Add Reminder.
- Set the date and time for the reminder.
Best Practices for Using Categories, Flags, Reminders, and Colors
- Consistent Naming: Use meaningful names for categories (e.g., “Urgent,” “Personal,” “Work”).
- Limit Categories: Avoid overloading your system with too many categories to keep it manageable.
- Combine Features: Use flags and reminders together to ensure you never miss a follow-up task.
- Periodic Review: Regularly review flagged items and reminders to stay organized.
Conclusion
Categories, flags, reminders, and colors in Microsoft Outlook are invaluable tools for staying organized and efficient. Whether you’re managing a busy inbox, tracking important deadlines, or keeping your calendar in order, these features can simplify your workflow. By following the steps outlined above, you can maximize your productivity and stay on top of your tasks in Outlook.

