How to Set Up Windows 11, 10, 8.1, or 7 via a Bootable USB Drive
Installing Windows using a bootable USB drive is one of the most efficient and widely used methods. It allows you to quickly set up your operating system, whether you’re upgrading, performing a clean installation, or repairing a corrupted system. This guide provides step-by-step instructions on how to install Windows 11, 10, 8.1, or 7 using a bootable USB.
What You Need Before Starting
Before you begin the installation process, ensure you have the following items:
- A Bootable USB Drive:
- At least 8 GB of storage space (16 GB is recommended for Windows 11).
- A Windows ISO File:
- Download the Windows ISO file from the official Microsoft website.
- A Working Computer:
- Required to create the bootable USB.
- A USB Creation Tool:
- Tools like Rufus or Windows Media Creation Tool will help create a bootable USB.
- Target Device:
- The PC or laptop where you want to install Windows.
Step 1: Download the Windows ISO File
The Windows ISO file is necessary for creating a bootable USB.
- For Windows 11 and 10: Go to the Microsoft Download Page and download the appropriate ISO file.
- For Windows 8.1 or 7: You can find ISO files from Microsoft or third-party sources if officially unavailable.

Step 2: Create a Bootable USB Drive
You can use the Rufus tool or the Windows Media Creation Tool to create a bootable USB.
Using Rufus (Works for Windows 11, 10, 8.1, and 7):
- Download Rufus from the official website and install it.
- Insert your USB drive into the computer.
- Open Rufus and follow these steps:
- Device: Select your USB drive.
- Boot Selection: Click on SELECT and choose the downloaded Windows ISO file.
- Partition Scheme: Select GPT (for UEFI systems) or MBR (for Legacy BIOS systems).
- File System: Set it to NTFS.

- Click START and wait for the bootable USB to be created.
Using Windows Media Creation Tool (For Windows 11 and 10):
- Download the Windows Media Creation Tool from Microsoft.
- Run the tool and select Create installation media (USB flash drive, DVD, or ISO file).
- Follow the prompts and choose USB flash drive as the destination.
- Allow the tool to download and prepare the bootable USB.
Once the process is complete, you’ll have a bootable USB ready for installation.
Step 3: Boot from the USB Drive
To install Windows, you must boot your computer using the bootable USB drive.
- Insert the Bootable USB into the target computer.
- Restart the computer and enter the BIOS/UEFI settings:
- Press the BIOS key (usually F2, F10, F12, ESC, or DEL) during startup.

- Press the BIOS key (usually F2, F10, F12, ESC, or DEL) during startup.
- Change Boot Order:
- Navigate to the Boot menu in the BIOS settings.
- Set the USB drive as the first boot option.
- Save the changes and exit the BIOS.
- Your computer will now boot from the USB drive.
Step 4: Install Windows on Your Computer
Once the computer boots from the USB, follow these steps to install Windows:
- Windows Setup Screen:
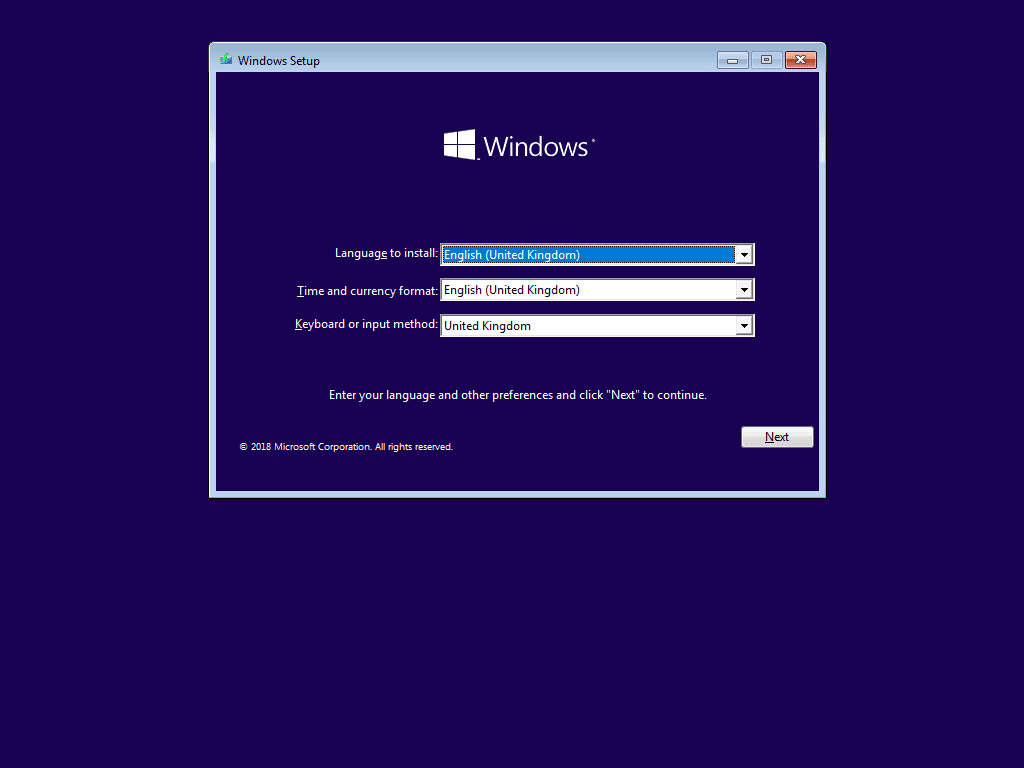
- When the Windows logo appears, you’ll see the Windows Setup screen.
- Select your Language, Time and Currency format, and Keyboard Input. Click Next.

- Start Installation:
- Click Install Now.
- Enter the Product Key:
- If prompted, enter the Windows product key. You can skip this step if you plan to activate Windows later.
- Accept the License Terms:
- Check the box for I accept the license terms and click Next.
- Choose Installation Type:
- Select Custom: Install Windows only (advanced) for a clean installation.

- Select Custom: Install Windows only (advanced) for a clean installation.
- Partition Management:
- You’ll see a list of drives and partitions.
- If you want to perform a clean installation, delete all existing partitions and create a new one:
- Select each partition and click Delete.
- Select the Unallocated Space and click Next.

- Installation Process:
- Windows will begin copying files and installing the operating system. This process may take several minutes.
- Restart the Computer:
- Once the installation is complete, the system will restart. Remove the USB drive to avoid booting into the setup again.
Step 5: Complete the Setup
After Windows restarts, you’ll need to go through the initial setup process:
- Region and Keyboard Layout:
- Confirm your region and keyboard layout.
- Network Connection:
- Connect to a Wi-Fi or Ethernet network if prompted.
- Sign in to Your Account:
- For Windows 11 and 10, sign in using a Microsoft account or create a local account.
- For Windows 8.1 and 7, you can create a local account.
- Customize Settings:
- Follow the on-screen instructions to configure privacy, updates, and other settings.
Step 6: Install Drivers and Updates
After the installation is complete:
- Go to Settings > Update & Security > Windows Update (for Windows 11/10) and check for updates.
- Install any missing drivers by visiting your computer manufacturer’s support website.
Conclusion
Installing Windows 11, 10, 8.1, or 7 using a bootable USB drive is a straightforward process when you follow the steps outlined in this guide. By creating a bootable USB, configuring the BIOS settings, and performing a clean installation, you can easily set up a new operating system on your computer. Whether you’re upgrading or starting fresh, this method ensures a smooth and efficient Windows installation process.

