How to Add Contacts to Microsoft Outlook

Importing contacts into Microsoft Outlook allows you to manage and access all your important contact information in one place. Whether you’re transitioning from another email platform, restoring a backup, or integrating contacts from another device, the process is straightforward. This comprehensive guide will walk you through all the necessary steps to import contacts into Microsoft Outlook efficiently.
Step 1: Prepare Your Contacts File
Before importing contacts into Microsoft Outlook, ensure the data is in the correct format.
1. Check the File Format
Outlook supports importing contacts using a CSV (Comma-Separated Values) file. If your contacts are in another format (e.g., vCard or Excel), convert them to CSV format.
- Exporting Contacts from Other Platforms:
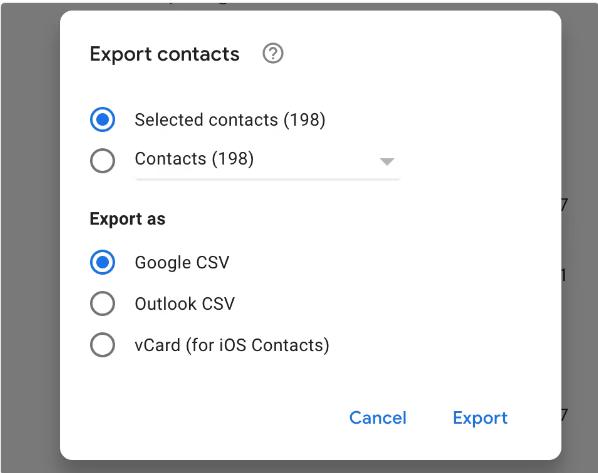
- Gmail: Navigate to Google Contacts, select contacts to export, and choose CSV for Outlook.
- iCloud: Export contacts to vCard and convert them to CSV using an online tool or spreadsheet software.
2. Organize Your Data
Ensure the CSV file has clear headers that match Outlook’s fields, such as:
- First Name
- Last Name
- Email Address
- Phone Number
- Company
Check for duplicates and remove any unnecessary data to simplify the import process.
Step 2: Open the Import Tool in Microsoft Outlook
To begin importing your contacts, locate the import/export tool within Outlook.
For Microsoft Outlook Desktop (Windows):
- Open Outlook and click on the File tab.
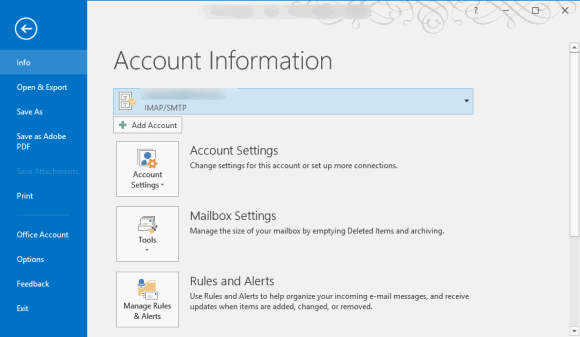
- Select Open & Export from the menu.
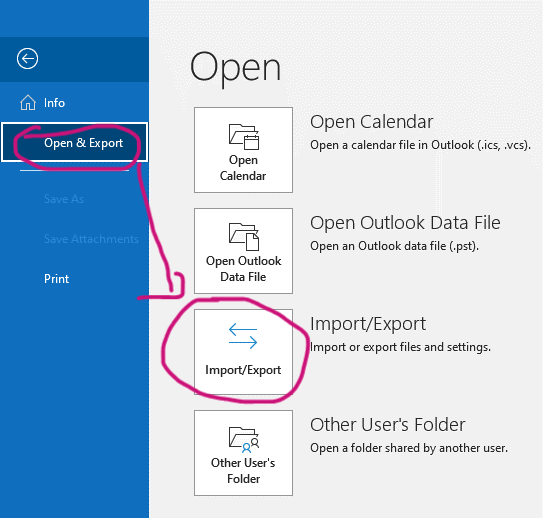
- Click Import/Export to launch the Import and Export Wizard.
For Outlook on Mac:
- Open Outlook and go to the Tools menu.
- Select Import.
- Choose the CSV option and click Continue.
Step 3: Import Your Contacts
The process for importing contacts may vary slightly depending on your Outlook version.
1. For Outlook on Windows
- Choose Action:
- In the Import and Export Wizard, select Import from another program or file and click Next.
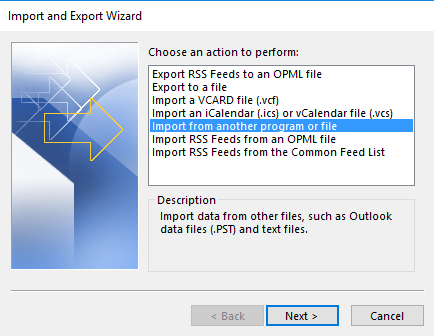
- In the Import and Export Wizard, select Import from another program or file and click Next.
- Select File Type:
- Choose Comma Separated Values (CSV) and click Next.
- Locate the File:
- Browse to the location of your CSV file and select it.
- Choose whether to allow duplicates, replace duplicates, or avoid duplicates.
- Select Destination Folder:
- Choose the Contacts folder under your Outlook account.
- Click Next.
- Map Custom Fields (Optional):
- Match your CSV file’s column headers to Outlook’s contact fields if necessary. For example, map “Phone” to “Business Phone.”
- Click Finish to complete the import process.
2. For Outlook on Mac
- After selecting the CSV file, Outlook will detect the data fields automatically.
- Confirm or adjust any field mappings, if necessary.
- Click Import to transfer the contacts into your Outlook contacts list.
Step 4: Verify the Imported Contacts
After the import is complete, it’s crucial to verify that your contacts were added correctly.
- Navigate to the Contacts section in Outlook.
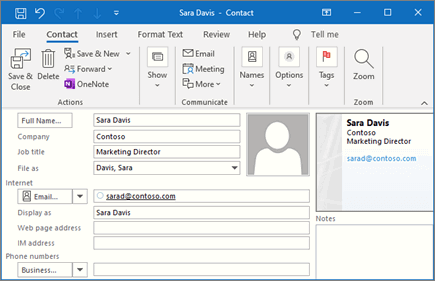
- Browse through the list to confirm that all fields, such as email addresses and phone numbers, are accurately populated.
- Search for a specific contact to ensure the data is accessible and organized.
Step 5: Troubleshoot Common Issues
If you encounter issues during the import process, here are some common problems and solutions:
1. Formatting Issues
- Problem: Data is misplaced or incomplete.
- Solution: Ensure your CSV file headers match Outlook’s contact fields. Correct the format in a spreadsheet editor (e.g., Excel) and re-import.
2. Duplicates
- Problem: Contacts are duplicated after import.
- Solution: During the import process, select the option to replace duplicates or skip them.
3. File Size Limits
- Problem: The CSV file is too large.
- Solution: Split the CSV file into smaller files and import them separately.
Step 6: Sync Contacts Across Devices
To access your imported contacts on other devices, enable contact synchronization.
For Outlook on Mobile Devices:
- Install the Outlook app on your iOS or Android device.
- Log in with the same account where your contacts are stored.
- Enable contact sync in the app’s settings.
For Other Devices:
- Ensure the Outlook account is added to your device and that contact sync is enabled.
Step 7: Organize Your Contacts in Outlook
Once your contacts are imported, take some time to organize them for better accessibility.
1. Categorize Contacts
- Assign categories (e.g., Work, Family, Friends) to your contacts for easy filtering.
- Right-click on a contact, choose Categorize, and select or create a category.
2. Clean Up Duplicates
- Use the Clean Up Duplicates tool in Outlook to find and merge duplicate entries.
3. Create Contact Groups
- For frequent group communications, create a Contact Group (or distribution list).
- Go to the Contacts section, click New Contact Group, and add members.
Step 8: Backup Your Contacts
Regularly back up your contacts to prevent data loss.
How to Export Contacts for Backup:
- Go to the File tab in Outlook.
- Select Open & Export > Import/Export.
- Choose Export to a file > Comma Separated Values (CSV).
- Select the Contacts folder and save the file to a secure location.
Conclusion
Importing contacts into Microsoft Outlook is a straightforward process when you follow the steps outlined above. By preparing your contacts file, using Outlook’s import tools, and organizing your data, you can manage your contacts more efficiently. Regular maintenance and backups will ensure your contact list remains up-to-date and secure, helping you stay connected with ease. Start organizing your Outlook contacts today!
