How to Activate Macros in Excel to Boost Productivity
Macros in Excel are a powerful tool that can significantly enhance productivity by automating repetitive tasks. By enabling and using macros, you can save time on data entry, formatting, and complex calculations. This comprehensive guide will walk you through the steps to enable macros in Excel and explain how they can improve your workflow.
1. What Are Macros in Excel and Why Enable Them?
A macro is a set of instructions that automate tasks in Excel. Created using Visual Basic for Applications (VBA), macros can automate anything from simple tasks like copying and pasting data to complex processes like generating reports or performing data analysis.
Benefits of Enabling Macros:
- Automation: Perform repetitive tasks automatically, saving time and reducing errors.
- Efficiency: Streamline processes, allowing you to focus on more critical tasks.
- Customization: Tailor macros to suit specific tasks and business needs.
- Increased Productivity: Reduces the time spent on manual tasks, boosting overall productivity.
Understanding these benefits helps you decide when and why to enable macros in Excel.
2. How to Enable Macros in Excel

By default, Excel disables macros for security reasons. However, enabling them is a straightforward process. Follow the steps below to enable macros and start automating your tasks.
Step-by-Step Guide to Enabling Macros:
- Open the Excel Workbook:
- Launch Excel and open the workbook that contains macros or where you want to create them.
- Go to the ‘File’ Tab:
- Click on the “File” tab in the top-left corner of Excel.
- Select ‘Options’:
- Scroll down and select “Options” at the bottom of the File menu.
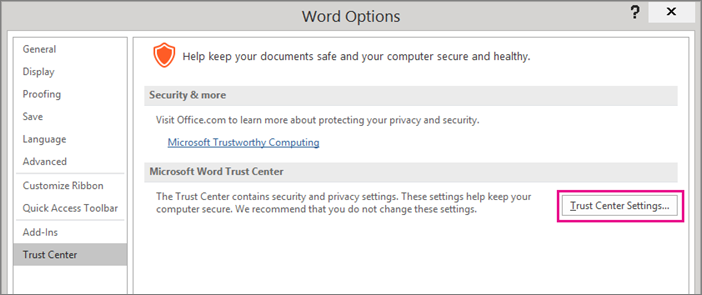
- Navigate to the ‘Trust Center’:
- In the Excel Options dialog box, click on “Trust Center” on the left-hand side.
- Click on ‘Trust Center Settings’:
- In the Trust Center section, click on “Trust Center Settings” on the right.
- Select ‘Macro Settings’:
- In the Trust Center dialog box, click on “Macro Settings” on the left-hand side.
- Enable Macros:
- Choose the option to “Enable all macros” (not recommended for general security but useful for trusted documents) or “Disable all macros with notification,” which prompts you when a macro is present.
- Click ‘OK’ to Apply the Changes:
- After selecting your preferred macro settings, click “OK” to apply the changes.
3. Using the Developer Tab to Manage Macros

The Developer tab in Excel provides a dedicated area to manage macros, record new ones, and access VBA tools. If the Developer tab is not visible, you’ll need to enable it first.
Step-by-Step Guide to Enabling the Developer Tab:
- Open Excel Options:
- Go to “File” > “Options” again.
- Navigate to the ‘Customize Ribbon’ Section:
- In the Excel Options window, click on “Customize Ribbon.”
- Enable the Developer Tab:
- On the right-hand side, check the box next to “Developer” under Main Tabs.
- Click ‘OK’ to Show the Developer Tab:
- Click “OK” to confirm. The Developer tab will now appear in the ribbon.
Once enabled, the Developer tab allows you to record, edit, and run macros easily.
4. Recording and Running a Macro

After enabling macros, you can begin creating and recording them to automate tasks. Excel’s macro recorder allows you to capture actions and save them as a macro, which you can run whenever needed.
Step-by-Step Guide to Recording a Macro:
- Go to the Developer Tab:
- Click on the “Developer” tab in the Excel ribbon.
- Click on ‘Record Macro’:
- In the “Code” group, click on “Record Macro.”
- Name Your Macro:
- In the dialog box that appears, enter a name for your macro (e.g., “DataFormatting”).
- Choose Where to Store the Macro:
- You can store the macro in “This Workbook” or choose “Personal Macro Workbook” to make it available in all workbooks.
- Perform the Actions You Want to Automate:
- After starting the recording, perform the actions you want to automate (e.g., formatting data, inserting rows).
- Click ‘Stop Recording’ When Finished:
- Once you’ve completed the tasks, click “Stop Recording” in the Developer tab.
Running a Recorded Macro:
- Go to the Developer Tab:
- Click on the “Developer” tab again.
- Click on ‘Macros’:
- In the “Code” group, click “Macros” to see a list of recorded macros.
- Select the Macro to Run:
- Choose the macro you want to run from the list, then click “Run.”
5. Best Practices for Using Macros in Excel
To maximize the effectiveness of macros in Excel and ensure the security of your files, consider these best practices:
- Only Enable Macros in Trusted Workbooks: Macros can contain malicious code, so only enable them in files from trusted sources.
- Regularly Back Up Data: Before running macros that modify data, ensure you have backups to avoid unintended data loss.
- Keep Macros Simple and Efficient: Avoid creating overly complex macros that may be difficult to debug or maintain.
- Document Your Macros: If you or others need to review or edit macros later, provide clear comments in the VBA code for better understanding.
Conclusion
Enabling macros in Excel opens up a world of possibilities for automating tasks, saving time, and enhancing productivity. Whether you are recording simple actions or writing advanced VBA code, macros are a valuable tool for any Excel user.
By following the steps outlined in this guide, you can easily enable macros, record your own, and use them to optimize your workflow. For more advanced macro techniques or to learn how to write VBA code, consider exploring additional resources or joining Excel training programs to further improve your skills.
