How to Update Your Office 2019
Upgrading from Office 2019 to a newer version of Microsoft Office is a straightforward process, but it requires careful planning to ensure a smooth transition. Whether you want to upgrade to Office 2021, Office 365 (now called Microsoft 365), or just ensure your Office 2019 suite is up to date, this guide will walk you through each step. Let’s dive in!
Why Should You Upgrade Office 2019?
Upgrading your version of Microsoft Office is important for several reasons:
- Security Updates: Newer versions often come with important security patches.
- New Features: With each version, Microsoft adds new features to enhance productivity.
- Support and Compatibility: As older versions of Office reach end-of-life, they may not support newer operating systems or file formats.
Step 1: Check Your Current Version
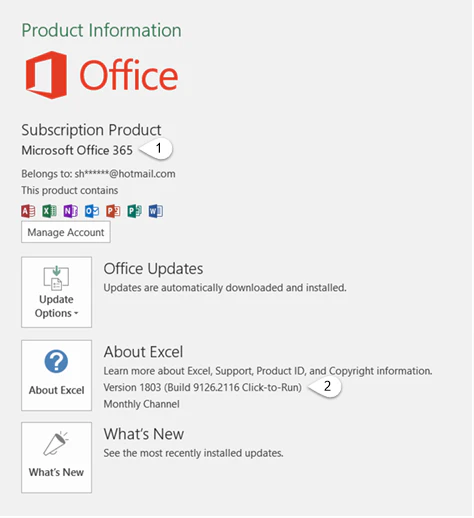
Before upgrading, it’s a good idea to first check the version of Office 2019 you are currently using and verify whether updates are available.
To Check the Current Version of Office:
- Open any Office application (e.g., Word, Excel).
- Click File in the top-left corner.
- Select Account from the sidebar.
- Under Product Information, look for the About Word (or the specific Office app you are using) section to see your version number.

If your version is up to date, you can proceed with upgrading to the latest Office version. Otherwise, ensure you have the latest patches before upgrading.
Step 2: Decide on the Version You Want to Upgrade To
Office 2019 users have a couple of main upgrade paths: Office 2021 and Microsoft 365 (formerly Office 365).
Office 2021
Office 2021 is the latest perpetual version of Microsoft Office. It’s a one-time purchase, meaning you don’t need to pay for a subscription. Office 2021 offers new features, enhanced performance, and security updates, but it lacks the cloud capabilities and collaboration features available with Microsoft 365.
Microsoft 365 (Office 365)
Microsoft 365 is a subscription-based service. It includes access to the latest versions of Office applications like Word, Excel, PowerPoint, and more, along with cloud storage via OneDrive and advanced collaboration tools. Subscribing to Microsoft 365 means you’ll always have access to the latest features and updates.
Step 3: Upgrade to Office 2021 or Microsoft 365
Once you’ve decided which version to upgrade to, you can proceed with purchasing and installing it. Below are the steps for upgrading to either Office 2021 or Microsoft 365.
To Upgrade to Office 2021:
- Go to the Microsoft Store or an authorized reseller to purchase Office 2021.
- Once purchased, you’ll receive a product key and instructions for downloading the software.
- Uninstall Office 2019 before installing Office 2021 to avoid conflicts (this step is optional but recommended).
- Go to the Microsoft Office website and sign in with your Microsoft account.
- Download the Office 2021 installer, then open it and follow the on-screen instructions to complete the installation.
- Enter the product key when prompted to activate Office 2021.
To Upgrade to Microsoft 365:
- Visit the Microsoft 365 website to subscribe to a plan that best suits your needs.
- After subscribing, sign in to your Microsoft account.
- Download and install Microsoft 365 using the Office app available on your device or through the Microsoft Store.
- Open any Office application, such as Word, and sign in with your Microsoft account to activate the subscription.
- Microsoft 365 will keep your apps up to date automatically as part of the subscription.

Step 4: Transfer Your Files and Settings
After installing the new version of Office, you may want to transfer your settings and files from Office 2019 to the new version.
- Files: All your Word, Excel, PowerPoint, and other Office documents should be compatible between Office 2019, Office 2021, and Microsoft 365. Simply open your existing files in the new version, and they will be automatically converted if necessary.
- Settings: Some settings, like custom dictionaries or preferences, may need to be manually reconfigured in the new version. However, if you’re switching to Microsoft 365, many of these settings are synchronized via your Microsoft account, making it easier to transfer.
Step 5: Uninstall Office 2019 (Optional)
If you no longer need Office 2019 after upgrading, you may want to uninstall it to free up disk space and avoid any potential conflicts with the new version.
To Uninstall Office 2019:
- Open the Control Panel by typing it into the search bar.
- Click Programs > Programs and Features.
- Find Microsoft Office 2019 in the list, right-click on it, and select Uninstall.
- Follow the on-screen prompts to complete the uninstallation.
Step 6: Manage Your Subscription (If Upgrading to Microsoft 365)
If you’ve decided to upgrade to Microsoft 365, managing your subscription is easy. You can modify your plan, renew your subscription, or cancel it at any time from the Microsoft 365 portal.
To Manage Your Subscription:
- Go to the Microsoft account portal.
- Sign in with your Microsoft account.
- Here, you can check your billing information, renew your subscription, or cancel it.
Step 7: Update Regularly
Once you’ve upgraded to the latest version, it’s essential to keep it updated to benefit from new features, bug fixes, and security improvements. Microsoft 365 automatically updates in the background, but you’ll need to manually check for updates if you’re using Office 2021.
To Check for Updates in Office 2021:
- Open any Office application (e.g., Word, Excel).
- Click on File > Account.
- Under Product Information, click Update Options > Update Now.
Conclusion
Upgrading from Office 2019 to a newer version like Office 2021 or Microsoft 365 ensures that you have access to the latest features and security updates. The process is simple, but it requires some preparation, such as deciding which version suits your needs, backing up your files, and uninstalling the old version if necessary. By following the steps outlined above, you can seamlessly upgrade and enhance your productivity with the latest Microsoft Office tools.

