How to resolve the “No speakers or headphones are plugged in” issue
The “No speakers or headphones are plugged in” error is a common issue that prevents users from hearing any sound on their computers. This can occur on both Windows 10 and Windows 11 systems and may be caused by hardware, software, or driver issues. If you’re encountering this problem, don’t worry – this guide will walk you through the steps to resolve the error and restore sound functionality.
1. Check the Physical Connections
Before diving into software-related fixes, it’s important to ensure that the hardware is set up properly.
Steps to Check Connections:
- Verify that your speakers or headphones are correctly plugged in:
- Ensure the audio cables are firmly connected to the correct port (usually the green 3.5mm jack on desktops or USB port for digital audio).
- For USB headphones, try using a different USB port to rule out faulty connections.

- Test with another device:
- Plug your speakers or headphones into another device (e.g., phone, tablet) to confirm they are working.
- If the problem persists with another device, the issue could be with your audio equipment.
- Check the volume settings:
- Ensure the volume is turned up on your speakers, headphones, and computer.
2. Restart Your Computer
Sometimes, a simple restart can resolve minor issues and reset audio configurations. Restart your computer and check if the error still appears.
3. Set the Correct Playback Device
If you’ve plugged in headphones or speakers and they still don’t show up as active audio devices, you might need to manually set them as the default playback device.
Steps to Set the Default Audio Device:
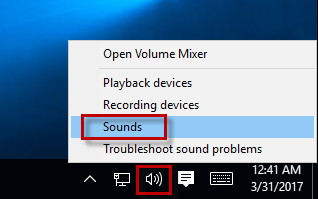
- Right-click the volume icon in the taskbar and select Sounds.

- In the Playback tab, right-click on your speakers or headphones and select Set as Default Device.

- If your device is not listed, right-click on an empty space and select Show Disabled Devices.
- If your headphones or speakers appear as disabled, right-click them and select Enable.
- Once enabled, set them as the default device.
4. Update or Reinstall Audio Drivers
Outdated or corrupted audio drivers are often the cause of the “No speakers or headphones are plugged in” error. Updating or reinstalling the drivers can often resolve this issue.
Steps to Update Audio Drivers:
- Press
Windows + Xand select Device Manager.

- Expand the Sound, video and game controllers section.
- Right-click on your audio device (usually listed as Realtek High Definition Audio or similar) and select Update Driver.

- Choose Search automatically for updated driver software.
- Follow the on-screen prompts to complete the update.
Steps to Reinstall Audio Drivers:
- In Device Manager, right-click the audio device and select Uninstall device.
- Restart your computer, and Windows will automatically reinstall the audio driver.
If Windows doesn’t reinstall the driver, visit the manufacturer’s website (e.g., Realtek, Intel, or your computer’s manufacturer) to download and install the latest version of the driver.
5. Run Windows Troubleshooter
Windows includes built-in troubleshooting tools that can automatically detect and fix common issues with audio devices.
Steps to Run the Audio Troubleshooter:
- Press
Windows + Ito open Settings. - Go to System > Sound.
- Under Advanced sound options, click Troubleshoot.
- Follow the on-screen instructions to detect and fix any audio problems.
6. Check the Audio Settings in the BIOS
In rare cases, the audio system might be disabled in the BIOS/UEFI. To check and enable it:
Steps to Enable Audio in BIOS:
- Restart your computer and press the appropriate key (usually F2, Del, or Esc) to enter BIOS/UEFI settings.
- Look for an option related to Integrated Peripherals or Onboard Devices.
- Ensure that HD Audio or similar is enabled.
- Save the changes and exit BIOS.
7. Disable Audio Enhancements
Some users find that audio enhancements can cause issues with their playback devices. Disabling them may resolve the problem.
Steps to Disable Audio Enhancements:
- Right-click the volume icon and select Sounds.
- In the Playback tab, right-click your default audio device and choose Properties.
- Go to the Enhancements tab.
- Check the box that says Disable all enhancements.
- Click OK and test your audio.
8. Check for Windows Updates
Sometimes, the error can be caused by missing Windows updates that affect the audio driver or system files. Keeping your system up to date can resolve compatibility issues.
Steps to Check for Updates:
- Press
Windows + Ito open Settings. - Go to Update & Security.
- Click Check for updates.
- Install any available updates and restart your computer.
9. Use the Audio Control Panel (Realtek Users)
If you’re using Realtek audio drivers, the Realtek HD Audio Manager may have settings that need to be adjusted.
Steps to Access the Realtek Control Panel:
- Right-click the volume icon in the taskbar and select Realtek HD Audio Manager (if available).
- Click the Speakers or Headphones tab and ensure the correct device is selected.
- Adjust any additional settings, such as speaker configuration, to match your setup.
10. Reset Windows Audio Services
If the Windows audio services are not functioning properly, resetting them might fix the issue.
Steps to Reset Audio Services:
- Press
Windows + R, type services.msc, and press Enter. - In the Services window, scroll down to Windows Audio.
- Right-click Windows Audio and select Restart.
- Repeat this for Windows Audio Endpoint Builder.
- Restart your computer.
Conclusion
The “No speakers or headphones are plugged in” error can be frustrating, but it is usually fixable with the steps provided above. Start by checking hardware connections and verifying that the correct playback device is selected. If that doesn’t work, updating or reinstalling your drivers, running the built-in troubleshooter, and adjusting system settings should help resolve the issue. If the problem persists, performing a system restore or contacting technical support may be necessary.

