SAAC's Team
December 10, 2024
How to Insert and Modify a Table in Microsoft Word
Tables are a powerful feature in Microsoft Word that allow you to organize data clearly and efficiently. Whether you’re creating a report, a schedule, or a comparison chart, tables can enhance your document’s structure and readability. This guide will walk you through the process of adding and customizing tables in Microsoft Word.
Step 1: Open Microsoft Word and Your Document
- Open Microsoft Word from your desktop, Start menu, or taskbar.
- Open an existing document where you want to add a table or create a new blank document.

Step 2: Insert a Table

- Go to the Insert Tab
- Click on the Insert tab in the top menu bar of Word.
- Select the Table Option
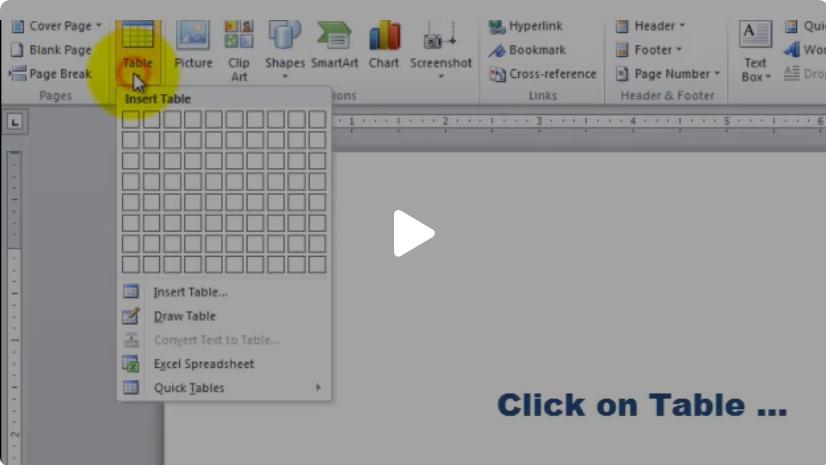
- In the Insert ribbon, find the Table option. Click on it to open a dropdown menu.
- Choose a Table Size
- Use your mouse to select the desired number of rows and columns by hovering over the grid in the dropdown menu. For example, if you need a table with 4 columns and 5 rows, highlight that grid, then click to insert the table.
Step 3: Add Content to the Table
- Type Inside the Table
- Click inside any cell of the table and start typing to add content. Press Tab to move to the next cell or Enter to create a new line within a cell.
- Adjust Column and Row Sizes
- Hover your mouse over the edges of a cell, column, or row. Click and drag to resize them as needed.
Step 4: Customize Table Design

- Select the Table
- Click anywhere inside the table to display the Table Design and Layout tabs in the toolbar.
- Apply a Predefined Style
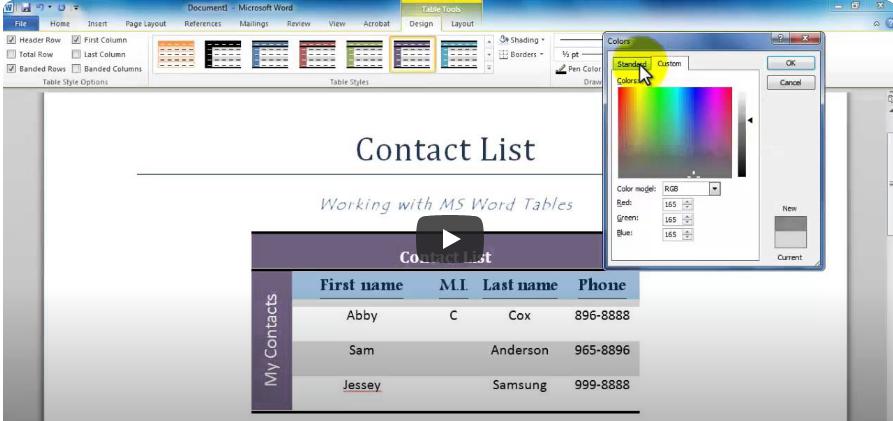
- Go to the Table Design tab and select a style from the Table Styles gallery. Word provides various predefined styles with different colors, borders, and shading.
- Customize Borders and Shading
- In the Table Design tab, use the Borders and Shading tools to add or modify the lines and colors in your table.
Step 5: Adjust Table Layout

- Insert or Delete Rows and Columns
- Go to the Layout tab. Use the Insert Above, Insert Below, Insert Left, or Insert Right buttons to add rows or columns.
- To delete, select the row or column, then click Delete Rows or Delete Columns in the Layout tab.
- Merge or Split Cells
- Select multiple cells that you want to merge. In the Layout tab, click Merge Cells.
- To split a cell into multiple cells, click Split Cells and specify the number of rows and columns.
- Align Text
- Use the alignment options in the Layout tab to position text (e.g., center-align, top-align) within the table cells.
Step 6: Advanced Customizations
- Add Table Headers
- Create a header row by typing your column titles in the top row. You can format the header row with bold text or shading.
- Sort Data in the Table
- Select the table or specific column you want to sort. Go to the Layout tab, then click Sort to arrange data in ascending or descending order.
- Add a Caption
- Right-click on the table, select Insert Caption, and type a title for your table to improve readability and reference.
- Resize the Entire Table
- Drag the corner of the table to resize it or adjust the table width using the Table Width options in the Layout tab.
Step 7: Save and Review Your Table
- Save your document frequently by clicking Ctrl + S or using the Save button.
- Review your table to ensure proper alignment, formatting, and data accuracy.
Troubleshooting Common Issues
Table Doesn’t Fit on the Page
- Use the AutoFit option in the Layout tab to adjust the table’s size to fit the page or its contents.
Uneven Rows or Columns
- Manually resize rows and columns by dragging their edges or using precise measurements in the Layout tab.
Text Overflow in Cells
- Wrap text by enabling the Text Wrapping option in the Layout tab or resizing the columns.
Conclusion
Adding and customizing a table in Microsoft Word is an easy way to structure information visually and professionally. With Word’s powerful tools, you can tailor your table’s design, layout, and functionality to meet your needs. By following this guide, you’ll be able to create polished tables for any type of document.
Subscribe
Login
0 Comments
Oldest
