How to Add and Install a Language Pack in Microsoft Office
Microsoft Office provides Language Accessory Packs (LAPs) to add additional language support for proofing tools, display, and help. This feature is beneficial for multilingual users or those working with documents in multiple languages. Below is a comprehensive guide to installing and configuring the Language Accessory Pack for Microsoft Office.
Step 1: Check Your Version of Office
Before downloading the Language Accessory Pack, ensure that you know the version of Office installed on your computer.
Steps to Check Your Office Version:
- Open an Office App:
- Launch any Office app, such as Word or Excel.
- Go to Account Settings:
- Click on File > Account (or Office Account in some versions).
- Find the Version Information:
- Look under Product Information for your Office version (e.g., 32-bit or 64-bit, Office 2016, 2019, or 365).
Step 2: Download the Language Accessory Pack

Once you know your Office version, proceed to download the Language Accessory Pack.
Steps to Download:
- Visit the Official Microsoft Website:
- Navigate to the Language Accessory Pack download page.
- Select Your Language:
- From the list of available languages, choose the one you want to install.
- Download the Correct File:
- Ensure you download the appropriate file for your Office version (32-bit or 64-bit).
Step 3: Install the Language Accessory Pack
After downloading, the next step is to install the Language Accessory Pack.
Steps to Install:
- Run the Installer:
- Double-click the downloaded file to start the installation process.
- Follow the On-Screen Instructions:
- The installation wizard will guide you through the process. Click Next to proceed.
- Wait for Completion:
- Once the installation finishes, click Close.
Step 4: Configure the Language Settings in Office

Installing the Language Accessory Pack doesn’t automatically change the language settings. You must configure them manually.
Steps to Configure:
- Open an Office App:
- Launch any Office app (e.g., Word).
- Access Language Preferences:
- Go to File > Options > Language.
- Add the New Language:
- In the dialog box, under Office Display Language or Office Authoring Languages, click Add a Language.
- Select the newly installed language and click Add.
- Set as Default (Optional):
- If you want to make the new language your default, select it and click Set as Default.
- Restart Office:
- Close all Office apps and reopen them to apply the changes.
Step 5: Verify the Installation
Finally, verify that the Language Accessory Pack is functioning correctly.
Steps to Verify:
- Check Display Language:
- Open an Office app and ensure the menus and ribbons are displayed in the newly installed language (if configured).
- Test Proofing Tools:
- Open a document and type in the new language. Use the spell check tool to confirm it recognizes the language.
Troubleshooting Common Issues
If you encounter issues during installation or configuration, try the following:
- Check Compatibility: Ensure the Language Accessory Pack matches your Office version.
- Update Office: Use File > Account > Update Options > Update Now to install the latest Office updates.
- Reinstall the Pack: If the pack doesn’t work, uninstall and reinstall it.
- Contact Support: Visit the Microsoft Support Page for additional help.
Illustration
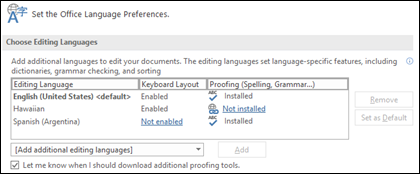
Here is an example of how to configure language preferences in Microsoft Office:
This image shows the Office Language Preferences dialog box, where users can add and configure languages.
Conclusion
The Microsoft Office Language Accessory Pack enhances your productivity by providing multilingual support. By following the steps above, you can easily download, install, and configure the pack to suit your needs.
