How to Activate Remote Desktop on Windows
Remote Desktop allows you to access and control your Windows computer from another device, making it an essential tool for remote work, troubleshooting, or accessing files while away. This guide will show you step-by-step how to enable Remote Desktop on a Windows computer.
Benefits of Remote Desktop
- Work from Anywhere: Access your computer from another location.
- Troubleshoot Remotely: Assist others or solve issues on your device without being physically present.
- Access Files Easily: Retrieve files from your PC using another device.
Steps to Enable Remote Desktop on Windows
Step 1: Check Your Windows Version
Remote Desktop is available on Windows Professional, Enterprise, and Education editions. To check your version:
- Press
Win + Ito open Settings. - Go to System > About.
- Under Windows Specifications, check your edition.

If you’re using Windows Home, you’ll need to upgrade to enable Remote Desktop.
Step 2: Open Remote Desktop Settings
- Press
Win + Ito open Settings. - Click on System.
- In the left-hand menu, select Remote Desktop.

Step 3: Enable Remote Desktop
- Toggle the switch under Enable Remote Desktop to On.
- A confirmation dialog will appear. Click Confirm to proceed.
Step 4: Note Your PC Name
Your PC name is required to connect to the computer remotely.
- In the same Remote Desktop settings window, scroll down to How to connect to this PC.
- Note the name of your PC listed under PC Name.
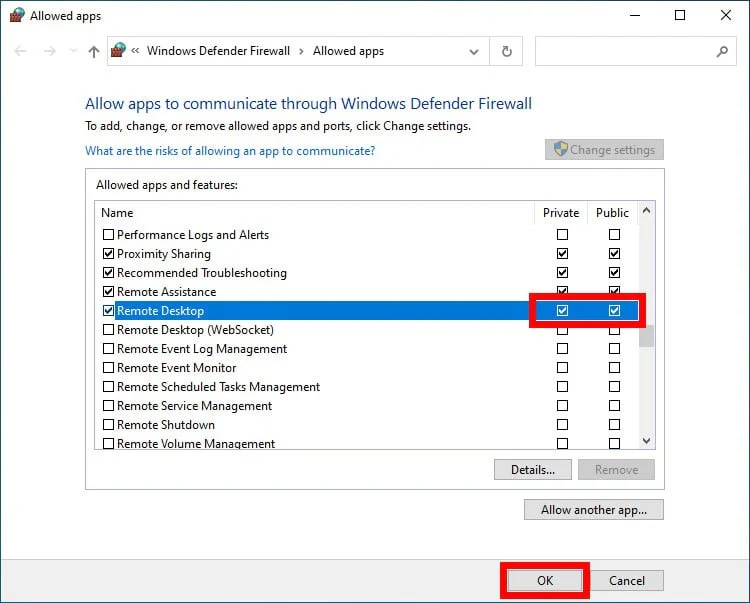
Step 5: Allow Remote Desktop Through Firewall
To ensure connections aren’t blocked by the Windows Firewall:
- Open the Start Menu and type Firewall.
- Select Windows Defender Firewall.
- Click Allow an app or feature through Windows Defender Firewall in the left-hand menu.
- Locate Remote Desktop in the list, and ensure both Private and Public boxes are checked.

Step 6: Set Up User Permissions
By default, only users with administrator privileges can connect via Remote Desktop. To add more users:
- Go back to the Remote Desktop Settings window.
- Under User Accounts, click Select users that can remotely access this PC.
- Click Add, type the username, and click OK.
Step 7: Connect to the PC Remotely
Now that Remote Desktop is enabled, you can connect from another device.
On Windows
- Open the Remote Desktop Connection app (search for it in the Start Menu).
- Enter the PC name and click Connect.
- Log in with your username and password.
On macOS or Mobile Devices
- Download the Microsoft Remote Desktop app from the App Store or Google Play.
- Add a new connection, entering your PC name and login credentials.
- Tap Connect to access your computer.
Troubleshooting
Remote Desktop Not Working
- Ensure PC is Online: Check that the target PC is powered on and connected to the internet.
- Verify Network Settings: Make sure both devices are on the same network or configured for remote access via the internet.
- Update Drivers: Outdated drivers may prevent a successful connection.
Error: “Remote Desktop Can’t Connect to the Remote Computer”
- Check Firewall Rules: Ensure the firewall is not blocking the connection.
- Reboot the PC: Restart both the local and remote devices.
Conclusion
Enabling Remote Desktop on Windows is straightforward and provides a powerful way to access your PC remotely. By following the steps above, you’ll be ready to use this feature for work, troubleshooting, or file access. Make sure to safeguard your connections with strong passwords and secure networks for maximum protection.

