How to Resolve the “Windows Can’t Set Up a Homegroup on This Computer” Issue
Homegroups were a popular feature in earlier versions of Windows, allowing users to easily share files and printers between computers on the same network. However, some users encounter the error message: “Windows can’t set up a homegroup on this computer.” This issue may arise due to incorrect network configurations, disabled services, or corrupted system files. This guide outlines detailed steps to resolve this issue effectively.
Common Causes of the Error
- Service Dependencies Not Running: Homegroup functionality relies on several background services that may not be active.
- Corrupted Network Settings: Network configurations or adapter settings may be misconfigured.
- System File Corruption: Damaged system files can prevent the Homegroup feature from functioning correctly.
- IPv6 Is Disabled: Homegroups require IPv6 to be enabled.
Step-by-Step Solutions
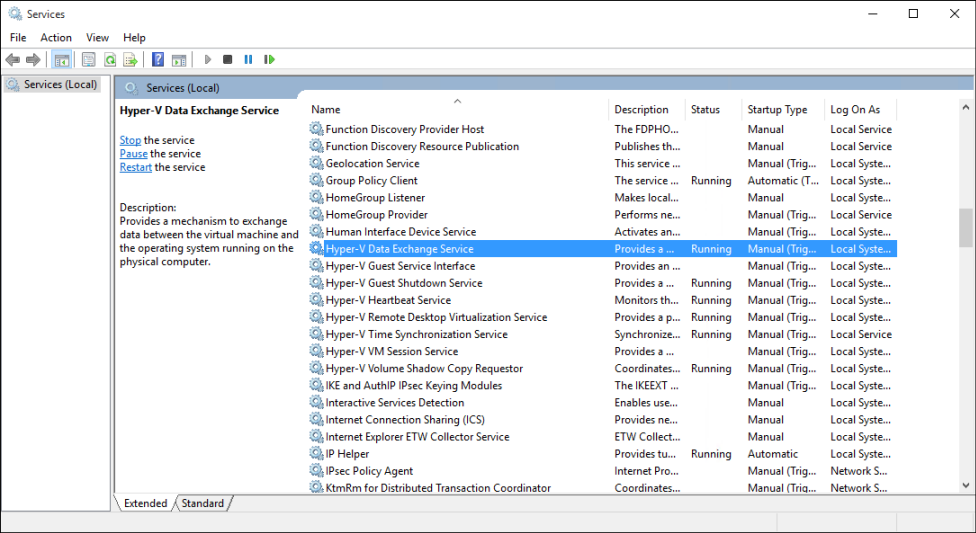
Step 1: Check and Start Required Services
Several services must be running for the Homegroup feature to work properly.
- Open the Services Manager:
- Press
Win + R, typeservices.msc, and press Enter.
- Press
- Locate the Following Services:
- Peer Networking Grouping
- HomeGroup Listener
- HomeGroup Provider
- Restart the Services:
- Right-click on each service, select Restart, and ensure their Startup type is set to Automatic.

Step 2: Enable IPv6
Homegroups rely on the IPv6 protocol for communication between devices.
- Open Network Settings:
- Right-click the Network icon in the taskbar and select Open Network & Internet Settings.
- Access Network Adapter Properties:
- Click Change adapter options under Advanced network settings.
- Enable IPv6:
- Right-click your active network connection, select Properties, and ensure Internet Protocol Version 6 (TCP/IPv6) is checked.

Step 3: Delete the Homegroup Folder
Corrupt Homegroup configurations may prevent setup. Deleting the Homegroup folder resets the feature.
- Open File Explorer:
- Navigate to the folder:
C:\Windows\ServiceProfiles\LocalService\AppData\Roaming\PeerNetworking.
- Navigate to the folder:
- Delete Contents:
- Delete all files in the PeerNetworking folder.
- Restart the Computer:
- Reboot your system and try setting up the Homegroup again.
Step 4: Use the HomeGroup Troubleshooter
- Open Control Panel:
- Press
Win + R, typecontrol, and press Enter.
- Press
- Access Troubleshooting:
- Navigate to System and Security > Troubleshooting.
- Run HomeGroup Troubleshooter:
- Click HomeGroup and follow the prompts to detect and fix issues.

Step 5: Reset Network Settings
Resetting your network settings can resolve configuration issues.
- Open Settings:
- Press
Win + Iand go to Network & Internet.
- Press
- Reset Network:
- Scroll down and select Network reset.
- Restart Your Computer:
- After the reset completes, reboot your system and attempt to set up the Homegroup again.
Step 6: Check System File Integrity
Corrupted system files can disrupt Homegroup functionality.
- Open Command Prompt as Administrator:
- Press
Win + Xand select Command Prompt (Admin).
- Press
- Run SFC Command:
- Type
sfc /scannowand press Enter.
- Type
- Wait for the Scan:
- The system will repair any detected corrupted files.
Step 7: Configure Firewall Settings
Your firewall might be blocking Homegroup-related services.
- Open Control Panel:
- Go to System and Security > Windows Defender Firewall.
- Allow an App Through Firewall:
- Click Allow an app or feature through Windows Defender Firewall.
- Enable HomeGroup Features:
- Ensure that HomeGroup Listener and HomeGroup Provider are checked for both private and public networks.
Step 8: Update Windows
Microsoft frequently releases updates to address bugs and improve performance.
- Check for Updates:
- Open Settings > Update & Security > Windows Update.
- Install Updates:
- Click Check for updates and install all available updates.
Conclusion
The “Windows can’t set up a homegroup on this computer” error can be frustrating but is often fixable using the methods outlined above. Start with basic troubleshooting like restarting services or enabling IPv6, and move to more advanced steps like resetting network settings or running the system file checker if the issue persists.
Following these steps will help you restore Homegroup functionality and easily share resources across your network again.

