Guide to Setting Up Microsoft Teams
Microsoft Teams is a powerful collaboration tool that enables users to chat, meet, share files, and work together seamlessly. Setting up Microsoft Teams is straightforward, whether you’re using it for work, school, or personal projects. Follow these steps to get Microsoft Teams up and running on your device.
Step 1: Download and Install Microsoft Teams
- Visit the Microsoft Teams Website: Open a web browser and go to the Microsoft Teams download page at https://www.microsoft.com/en-us/microsoft-teams/download-app.

- Select Your Platform: Choose the appropriate version for your operating system (Windows, Mac, or mobile) and click “Download.”
- Install Teams: Once the download is complete, locate the installer file in your Downloads folder and open it to begin the installation. Follow the prompts to complete the installation process.

Step 2: Sign in to Microsoft Teams
- Open Microsoft Teams: Launch the Teams application on your device.

- Sign in with Your Microsoft Account: Enter your Microsoft account credentials. If you don’t have an account, you can create one by clicking “Sign Up for Free” on the login page.
- Choose the Type of Account: If Teams is for work or school, select that option. Alternatively, if you’re using Teams for personal use, choose the personal account option.
Step 3: Create or Join a Team
Once signed in, you can create a new team or join an existing one.
- Create a New Team:
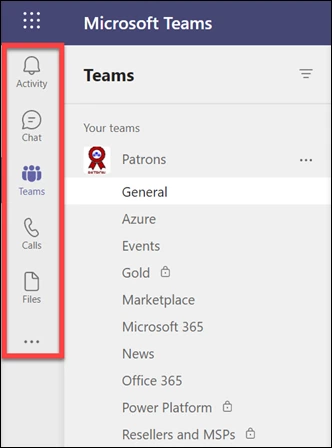
- Click on “Teams” from the left-hand menu.

- Select “Join or create a team” at the bottom of the Teams panel.
- Choose “Create a team” and follow the prompts to name your team, add a description, and set the privacy level (private or public).
- After creating the team, you can start adding members by entering their email addresses or usernames.
- Click on “Teams” from the left-hand menu.
- Join an Existing Team:
- If you’ve been invited to a team, check for an invite link from the team owner.
- Alternatively, go to the “Teams” section, select “Join or create a team,” and enter the team code provided by the team owner.
Step 4: Set Up Channels for Organization
Teams organizes content in channels, which act as dedicated spaces for different topics or projects.
- Create a Channel:
- In your team, click the More options (three dots) next to the team name and select “Add channel.”
- Name the channel and provide a description if needed. Decide if the channel should be Standard (visible to everyone) or Private (only accessible to specific members).
- Organize and Manage Channels:
- Use channels to organize discussions, files, and meetings for different topics.
- Members can be notified about updates in specific channels by selecting the “Channel notifications” option.
Step 5: Schedule and Join Meetings
Microsoft Teams provides a seamless way to schedule and join virtual meetings.
- Schedule a Meeting:
- Go to the Calendar tab on the left sidebar and click on “New meeting.”

- Fill in the details for the meeting, including title, attendees, date, and time.
- Set the meeting frequency, add a description, and choose the channel for the meeting if applicable. Click “Save” to schedule the meeting.
- Go to the Calendar tab on the left sidebar and click on “New meeting.”
- Join a Meeting:
- When it’s time to join, click on the “Join” button in your calendar or the meeting invite.
- Adjust audio and video settings as needed before clicking “Join Now” to enter the meeting.
Step 6: Chat and Collaborate
Teams offers a chat feature where members can communicate in real-time.
- Start a Chat:
- Click on the Chat tab on the left sidebar to open a chat window.

- Enter the names or email addresses of the people you want to chat with and start typing.
- Click on the Chat tab on the left sidebar to open a chat window.
- Share Files and Collaborate:
- In the chat or team channels, click on the Attach (paperclip icon) to upload files. Files shared in channels are saved in the team’s file storage.
- Team members can view, edit, and collaborate on shared files directly within Teams.
Step 7: Customize Settings and Notifications
Personalize your Teams experience to fit your preferences.
- Manage Notifications:
- Go to your Profile icon, select Settings, then Notifications to customize notifications for messages, meetings, and more.
- Adjust Appearance and Theme:
- In the Settings section, you can also change the theme (light, dark, or high contrast) and other appearance settings.
Troubleshooting Tips
If you encounter issues, here are some troubleshooting steps:
- Restart the App: Close Teams and restart the app to resolve minor glitches.
- Check Internet Connection: A stable internet connection is essential for smooth functionality.
- Update Teams: Go to Help > Check for updates to ensure you’re using the latest version.
Conclusion
Setting up Microsoft Teams allows you to enhance collaboration and streamline communication. From creating teams and channels to scheduling meetings and sharing files, Teams provides powerful tools to stay connected with your team.
