How to Adjust Margins in Google Docs

Google Docs provides various options for setting and customizing margins. Adjusting margins can enhance the structure of your document and ensure it meets formatting requirements. In this guide, we’ll walk through different ways to change margins, including customizing them for specific sections of your document.

Why Change Margins in Google Docs?
Changing margins in Google Docs helps control the whitespace around the text, giving your document a cleaner look. Adjusting margins can also improve readability and fit more content onto a page, making it especially useful for reports, essays, and other professional documents.
Method 1: Change Margins Using the Page Setup
The Page Setup menu is the easiest way to adjust margins in Google Docs, allowing you to set uniform margins for the entire document.
Steps:
- Open Page Setup:
- In your Google Doc, click on File in the top left corner.
- From the dropdown, select Page setup. This will open a dialog box.
- Adjust Margins:
- In the Page Setup dialog, you’ll see fields labeled Top, Bottom, Left, and Right.
- Enter the desired margin size for each side. For instance, entering “1” will set a 1-inch margin on all sides.
- Set as Default (Optional):
- If you want these margins as the default for all new documents, click Set as default.
- Click OK:
- After setting the desired margins, click OK to apply them. The document will automatically update to reflect your changes.
Tip: Use Page Setup when you need a consistent margin across the entire document.
Method 2: Change Margins Using the Ruler
If you need more flexibility, Google Docs’ ruler allows you to adjust left and right margins by dragging sliders. This method is ideal if you want to change only the left or right margin without opening the Page Setup menu.
Steps:
- Enable the Ruler (if not visible):
- In the View menu at the top, check Show ruler to display the ruler at the top of the document.
- Adjust Left Margin:
- On the ruler, locate the small blue slider on the left. This controls the left margin.
- Click and drag the slider to increase or decrease the left margin.
- Adjust Right Margin:
- On the right side of the ruler, find the blue slider that controls the right margin.
- Drag it left or right to adjust the right margin.
Tip: The ruler method is useful for quick adjustments or non-standard margin settings.
Method 3: Set Custom Indents Without Affecting Margins
Google Docs also allows you to set indents, which can help position text without changing the overall margins. This is useful for formatting paragraphs or specific sections.
Steps:
- Use the Ruler:
- Click on the blue triangle slider on the left side of the ruler. This controls the First Line Indent for the current paragraph.
- To move the whole paragraph without changing the first line, drag the Left Indent (the small rectangle) to adjust where the paragraph starts.
- Use Format > Align & Indent:
- Go to Format > Align & Indent > Indentation options.
- You’ll see options for Left and Right indents. Enter the values to set custom indents.
- Click Apply to make the changes.
Note: Indents are useful for creating structured lists or sub-sections without changing the overall margin.
Setting Margins for Specific Sections
Unlike traditional word processors, Google Docs applies margin settings to the entire document rather than specific sections. However, there are workarounds if you want to simulate different margins in specific areas.
Workaround: Use Tables to Create Section Margins
By using tables with invisible borders, you can set custom margins for particular sections, such as headers or content blocks.
- Insert a Table:
- Go to Insert > Table and choose a 1×1 table.
- Resize Table Width:
- Adjust the width of the table to create the illusion of different left and right margins.
- Remove Borders (Optional):
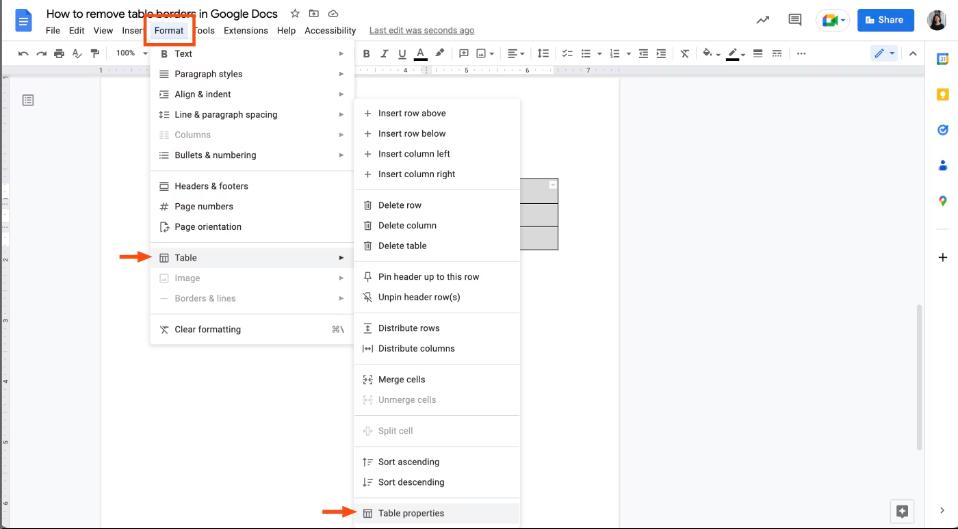
- Click on the table, go to Format > Table > Table properties, and set Border width to 0 to hide the borders.
Tip: Using tables is a flexible way to set custom margins for specific parts of your document, like quotes or block content.
Common Margin Sizes and Their Uses
Depending on the document type, there are recommended margin sizes:
- Standard Documents: 1-inch margins on all sides (default for most reports and essays).
- Professional Reports: 1-inch top and bottom, 0.75-inch left and right.
- Compact Layouts: 0.5-inch margins on all sides.
Tip: For professional documents, check any specific guidelines for margin requirements.
Frequently Asked Questions
Q: Why can’t I set different margins for specific sections in Google Docs?
Google Docs applies margins across the entire document. However, you can use tables or adjust indents to create section-specific spacing.
Q: Can I change margins on mobile?
No, Google Docs mobile app does not support changing margins directly. You’ll need to adjust margins from a desktop version.
Q: How do I reset margins to default?
Open File > Page setup, and set all margin fields to “1” or select Set as default if you want to use this for all future documents.
Conclusion
Changing margins in Google Docs is straightforward and helps create a well-structured document layout. Whether adjusting the entire document’s margins through Page Setup, using the ruler for quick changes, or applying custom indents, these tools offer the flexibility you need for professional-looking documents. By following the steps in this guide, you’ll have a document with perfectly customized margins, suited for any type of content.
