Installing Language Accessory Packs for Microsoft Office: A Step-by-Step Guide

Microsoft Office Language Accessory Packs (LAPs) are add-ons that provide additional display, help, and proofing tools for different languages. They allow you to work with Office applications in your preferred language, even if it wasn’t included in your original installation. This comprehensive guide will walk you through the process of installing LAPs for Microsoft Office.
1. Determine Your Microsoft Office Version and Language

Before you begin, you need to know the version of Microsoft Office you have installed and the language you want to add. You can find this information by opening any Office application (e.g., Word) and going to “File” > “Account” (or “Help” in older versions).
2. Download the Language Accessory Pack
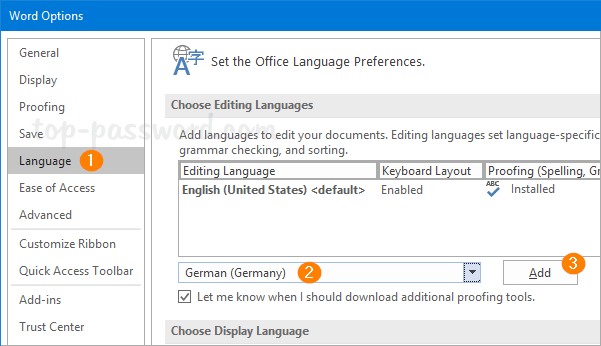
- Microsoft 365: If you have a Microsoft 365 subscription, language packs are included. Go to “File” > “Options” > “Language” and select the language you want to add. Office will automatically download and install the necessary files.
- Office 2019, 2016, or 2013: Visit the official Microsoft download page for Language Accessory Packs. Select your Office version and the desired language from the dropdown menus, then click “Download.”
3. Install the Language Accessory Pack

- Locate the Downloaded File: Find the downloaded language pack file (usually an .exe file).
- Run the Installer: Double-click the file to start the installation wizard.
- Follow the Instructions: The wizard will guide you through the installation process. Accept the license terms and choose the installation location.
- Complete Installation: Wait for the installation to finish. You may be prompted to restart your computer.
4. Change the Display and Help Languages (Optional)

- Open Office Application: Launch any Office application (e.g., Word).
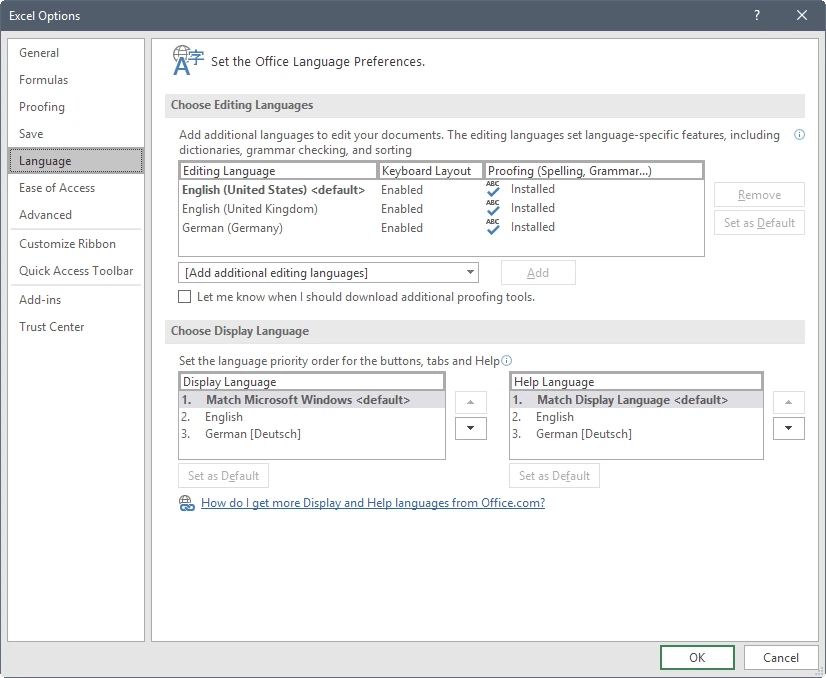
- Go to Options: Navigate to “File” > “Options” > “Language.”
- Choose Display Language: Select the newly installed language from the “Display Language” dropdown menu.
- Choose Help Language: Select the newly installed language from the “Help Language” dropdown menu.
- Restart Office: Close and reopen the Office application for the changes to take effect.
5. Enable Proofing Tools (Optional)

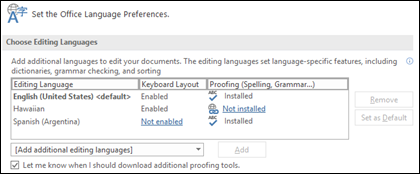
- Go to Language Preferences: In the same “Language” settings, find the “Office authoring languages and proofing” section.
- Add a Language: Click “Add a language” and select the newly installed language.
- Set as Default: If you want to use this language for spell check and grammar check, click “Set as Default.”
- Download Proofing Tools: If prompted, download and install the proofing tools for the new language.
Troubleshooting Tips:
- Check Compatibility: Ensure the language pack you download is compatible with your Office version and architecture (32-bit or 64-bit).
- Administrator Privileges: You may need administrator privileges to install the language pack.
- Restart Office: If the new language doesn’t appear immediately, try restarting your Office applications.
- Update Office: Make sure your Microsoft Office is up-to-date.
- Contact Support: If you encounter any issues, contact Microsoft support for assistance.
By following these steps, you can easily add new languages to your Microsoft Office suite, enhancing your productivity and enabling you to work seamlessly in your preferred language.

